分类器训练 - 验证
Scikit-learn(以前称为scikits.learn,也称为sklearn)是针对Python 编程语言的免费软件机器学习库。它具有各种分类,回归和聚类算法,包括支持向量机,随机森林,梯度提升,k均值和DBSCAN
分类器的训练以及测试(交叉验证)
Train & Test
load_digits
scikit-learn中自带了很多的数据集在sklearn.datasets模块中,load_digits是其中一个用于识别手写数字的数据集
导入load_digits并展示其数据集和结果
from sklearn.datasets import load_digits
# 关于手写数字识别的数据集
import matplotlib.pyplot as plt

# X的每行是64个图像像素的强度
# y是每个图片识别出来的数字0-9
X, y = load_digits(return_X_y=True)
print("X:\n", X)
print("y:\n", y)

# 绘制一下图片,灰度图
plt.imshow(X[0].reshape(8,8), cmap='gray')
plt.axis('off') # 关闭坐标轴
plt.show()
print("\nthe digit in the image is: ", y[0])
2
3
4
5
6
7
8
9
10
11
12
13
14
15

the digit in the image is: 0
通过train_test_split将数据集分割成独立的多个
- 若干独立的数据集和测试集可以用于训练机器学习模型
# 手动分割数据集
# 用多个独立的数据集训练模型
from sklearn.model_selection import train_test_split

X_train, X_test, y_train, y_test = train_test_split(X, y, stratify=y, random_state=12)
print(X_test)
2
3
4
5
6
- 这里
X_test为两个独立的数据集(矩阵)
建立模型并进行训练、测试
- 用
classifier.fit(x, y)进行训练,传入的是数据集 - 用
classifier.score(x, y)进行测试,传入的是准确的测试用例,即测试集
# 一旦拥有独立的训练和测试集,就可以使用fit方法学习机器学习模型
# 用score方法测试此方法
from sklearn.linear_model import LogisticRegression # 选择线性回归模型
# 建立线性回归模型
clf1 = LogisticRegression(solver='lbfgs',
                         multi_class='ovr', max_iter=5000, random_state=12)
# 通过已有数据集进行学习
clf1.fit(X_train, y_train)
accuracy1 = clf1.score(X_test, y_test)
print('Accuracy score of the {} is {:.2f}'.format(clf1.__class__.__name__, accuracy1))
2
3
4
5
6
7
8
9
10
Accuracy score of the LogisticRegression is 0.97
- 这里使用的是线性回归模型,
scikit_learn的api在各模型中保持一致
随机森林模型
# 同样我们还可以使用RandomForest模型进行学习,api基本保持一致
from sklearn.ensemble import RandomForestClassifier
# 建立模型
clf2 = RandomForestClassifier(n_estimators=100, n_jobs=-1,
                              random_state=12)
clf2.fit(X_train, y_train)
accuracy2 = clf2.score(X_test, y_test)
print('Accuracy score of the {} is {:.2f}'.format(clf2.__class__.__name__, accuracy2))
2
3
4
5
6
7
8
Accuracy score of the RandomForestClassifier is 0.99
load_breast_cancer
用同样的方法训练和测试load_breast_cancer乳腺癌数据集
导入数据集并对数据集进行独立分割
from sklearn.datasets import load_breast_cancer

X, y = load_breast_cancer(return_X_y=True)
print(len(X))
print(y[0])

from sklearn.model_selection import train_test_split
X_train, X_test, y_train, y_test = train_test_split(X, y, stratify=y, random_state=12)
print(X_train)
2
3
4
5
6
7
8
9
使用GradientBoostingClassifier梯度提升分类器建模进行训练和测试
from sklearn.ensemble import GradientBoostingClassifier
clf1 = GradientBoostingClassifier(n_estimators=100, random_state=12)
clf1.fit(X_train, y_train)
accuracy11 = clf1.score(X_test, y_test)
2
3
4
这里提供另一种测试精度的方法,使用predict预测函数对X_test进行预测得到y_pred,再调用balanced_accuracy_score评估方法对y_pred和y_test进行比对,进行精准度测试
from sklearn.metrics import balanced_accuracy_score
y_pred = clf1.predict(X_test)
accuracy12 = balanced_accuracy_score(y_test, y_pred)
print(accuracy11)
print(accuracy12)
2
3
4
5
- 这里
score函数和balanced_accuracy_score方法的精准度测试结果并不一样
使用其他的模型进行建模训练并测试
- 线性回归模型
- 随机森林模型
from sklearn.linear_model import LogisticRegression
clf2 = LogisticRegression(solver='lbfgs', max_iter=5000,
                          multi_class='ovr', random_state=12)
clf2.fit(X_train, y_train)
accuracy2 = clf2.score(X_test, y_test)
print(accuracy2)

from sklearn.ensemble import RandomForestClassifier
clf3 = RandomForestClassifier(n_estimators=100, n_jobs=-1, random_state=12)
clf3.fit(X_train, y_train)
accuracy3 = clf3.score(X_test, y_test)
print(accuracy3)
2
3
4
5
6
7
8
9
10
11
12
经测试,拟合效果梯度提升>随机森林>线性回归
Preprocess the Data
在训练和测试分类器之前预处理数据
预处理数据集
正常的分割、训练、测试过程
from sklearn.datasets import load_digits

X, y = load_digits(return_X_y=True)

from sklearn.model_selection import train_test_split

X_train, X_test, y_train, y_test = train_test_split(X, y, stratify=y, random_state=12)

from sklearn.linear_model import LogisticRegression

clf = LogisticRegression(solver='lbfgs', multi_class='auto', max_iter=1000, random_state=42)
clf.fit(X_train, y_train)
accuracy = clf.score(X_test, y_test)
print('Accuracy score of the {} is {:.2f}'.format(clf.__class__.__name__, accuracy))
print('{} required {} iterations to be fitted'.format(clf.__class__.__name__, clf.n_iter_[0]))
2
3
4
5
6
7
8
9
10
11
12
13
14
15
- Accuracy score of the LogisticRegression is 0.96
- LogisticRegression required 1000 iterations to be fitted
用MinMaxScaler对数据集进行预处理
from sklearn.preprocessing import MinMaxScaler

scaler = MinMaxScaler()
X_train_scaled = scaler.fit_transform(X_train)
X_test_scaled = scaler.transform(X_test)

clf = LogisticRegression(solver='lbfgs', multi_class='auto', max_iter=1000, random_state=42)
clf.fit(X_train_scaled, y_train)
accuracy = clf.score(X_test_scaled, y_test)
print('\nAccuracy score of the {} is {:.2f}'.format(clf.__class__.__name__, accuracy))
print('{} required {} iterations to be fitted'.format(clf.__class__.__name__, clf.n_iter_[0]))
2
3
4
5
6
7
8
9
10
11
- Accuracy score of the LogisticRegression is 0.97
- LogisticRegression required 189 iterations to be fitted
预处理的数据大大减少了训练时的迭代次数,能够有效提高训练效率
错误的预处理模式
预处理未拆分的数据集
- 即对
X直接进行预处理,再用train_test_split方法拆分
from sklearn.preprocessing import MinMaxScaler

scaler = MinMaxScaler()
X_scaled = scaler.fit_transform(X)

X_train_scaled, X_test_scaled, y_train, y_test = train_test_split(X_scaled, y, stratify=y, random_state=12)
2
3
4
5
6
对训练集和测试集独立预处理
- 即多次使用
fit_transform对数据多次拟合,这将导致在不同的拟合结果下进行标准化
from sklearn.preprocessing import MinMaxScaler

X_train, X_test, y_train, y_test = train_test_split(X, y, stratify=y, random_state=12)

scaler = MinMaxScaler()
X_train_scaled = scaler.fit_transform(X_train)
X_test_scaled = scaler.fit_transform(X_test)
2
3
4
5
6
7
Scikit-Learn 管道连接器
使用管道连接器在训练的同时预处理数据
- 这里涉及到
preprocessing, pipeline, linear_model三个模块,前者提供数据标准化方法,中者构造管道,后者选定模型 - 使用
pipe = 9make_pipeline(预处理数据方法, 学习模型(模型设置))的形式构造管道 - 使用
pipe.fit/score函数对数据集进行训练和测试
from sklearn.datasets import load_digits
X, y = load_digits(return_X_y=True)

from sklearn.model_selection import train_test_split
X_train, X_test, y_train, y_test = train_test_split(X, y, random_state=12, stratify=y)

from sklearn.preprocessing import MinMaxScaler
from sklearn.pipeline import make_pipeline
from sklearn.linear_model import LogisticRegression

pipe = make_pipeline(MinMaxScaler(),
                     LogisticRegression(solver='lbfgs', multi_class='auto', random_state=12, max_iter=1000))
pipe.fit(X_train, y_train)
accuracy = pipe.score(X_test, y_test)
print('Accuracy score of the {} is {:.2f}'.format(pipe.__class__.__name__, accuracy))
2
3
4
5
6
7
8
9
10
11
12
13
14
15
使用管道处理 breast_cancer
为什么要用管道训练,因为管道可以在fit的同时进行多个操作,如预处理和分类器学习
- 导入数据集:
sklearn.datasets - 拆分数据集:
sklearn.model_selection - 构建管道
- 数据预处理:
sklearn.preprocessing - 模型选择:
sklearn.linear_model - 管道构建:
from sklearn.pipeline import make_pipeline
- 数据预处理:
- 模型测试:
score(test)或from sklearn.metrics import balanced_accuracy_score(test, pred)
from sklearn.datasets import load_breast_cancer
X, y = load_breast_cancer(return_X_y=True)

from sklearn.model_selection import train_test_split
X_train, X_test, y_train, y_test = train_test_split(X, y, random_state=12, stratify=y)

from sklearn.preprocessing import StandardScaler
from sklearn.linear_model import SGDClassifier
from sklearn.pipeline import make_pipeline

pipe = make_pipeline(StandardScaler(), SGDClassifier(max_iter=1000))
pipe.fit(X_train, y_train)
y_pred = pipe.predict(X_test)

from sklearn.metrics import balanced_accuracy_score
accuracy = balanced_accuracy_score(y_test, y_pred)
print('Accuracy score of the {} is {:.2f}'.format(pipe.__class__.__name__, accuracy))
2
3
4
5
6
7
8
9
10
11
12
13
14
15
16
17
Cross-Validation
交叉验证,当数据越多越好时使用交叉验证的方式拆分数据集
交叉验证的步骤如下
- 导入数据:注意这里不需要独立分割数据,即使用
X,y即可 - 构建管道
- 选定模型
- 选定预处理方法
make_pipeline
- 交叉验证进行训练和测试
- 通过
DataFrame和pyplot绘图
导入数据并构建管道
导入数字识别数据集load_digits,预处理模式选择MinMaxScaler,学习模型选择LogisticRegression
from sklearn.datasets import load_digits
from sklearn.preprocessing import MinMaxScaler
from sklearn.linear_model import LogisticRegression
from sklearn.pipeline import make_pipeline

# 导入数据
X, y = load_digits(return_X_y=True)
# 构建管道
pipe = make_pipeline(MinMaxScaler(),
                    LogisticRegression(max_iter=1000, solver='lbfgs', multi_class='auto', random_state=12))
2
3
4
5
6
7
8
9
10
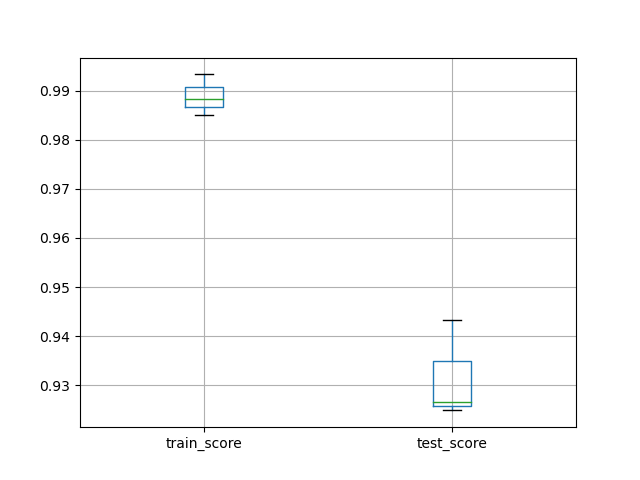
交叉验证和绘图
从模块model_selection中导入交叉验证函数cross_validate(train_test_split也在该模块),直接传入原数据集X,y获取验证结果scores
from sklearn.model_selection import cross_validate
# 交叉验证
scores = cross_validate(pipe, X, y, cv=3, return_train_score=True)
2
3
转化为DataFrame输出并作图
- 使用
DataFrame自带的boxplot函数做箱型图 - 要用
plt.show()进行展示
import pandas as pd
import matplotlib.pyplot as plt

# 构建DataFrame并绘制箱型图
df_scores = pd.DataFrame(scores)
df_scores[['train_score', 'test_score']].boxplot()
plt.show()
print(df_scores)
2
3
4
5
6
7
8
   fit_time  score_time  test_score  train_score
0  0.120385    0.000562    0.926544     0.988314
1  0.097318    0.000464    0.943239     0.984975
2  0.098848    0.000470    0.924875     0.993322
2
3
4
load_breast_cancer
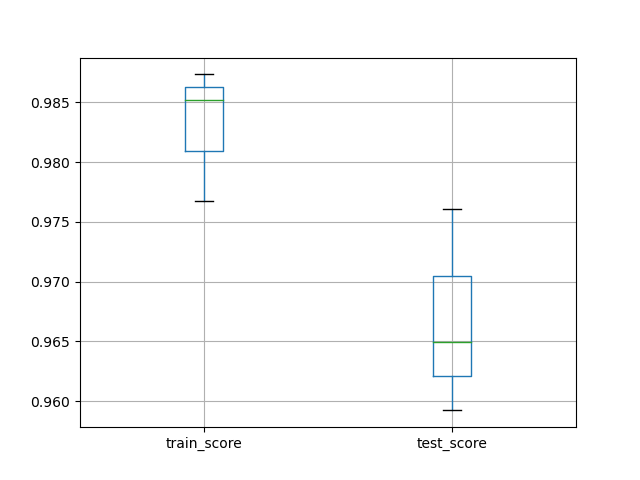
使用交叉验证在乳腺癌数据集上测试管道
from sklearn.datasets import load_breast_cancer

X, y = load_breast_cancer(return_X_y=True)

from sklearn.preprocessing import StandardScaler
from sklearn.model_selection import cross_validate
from sklearn.pipeline import make_pipeline
from sklearn.linear_model import SGDClassifier

pipe = make_pipeline(StandardScaler(), SGDClassifier(max_iter=1000))
scores = cross_validate(pipe, X, y,  scoring='balanced_accuracy',
                        cv=3, return_train_score=True)

import pandas as pd
import matplotlib.pyplot as plt

df_scores = pd.DataFrame(scores)
df_scores[['train_score', 'test_score']].boxplot()
plt.show()
print(df_scores)
2
3
4
5
6
7
8
9
10
11
12
13
14
15
16
17
18
19
20
   fit_time  score_time  test_score  train_score
0  0.002559    0.017959    0.964907     0.985160
1  0.001544    0.000525    0.959226     0.976757
2  0.001338    0.000481    0.976050     0.987336
2
3
4
- 步骤与上完全相同
- 不同之处在于
- 数据集不同
- 学习模型使用
SGDClassifier - 预处理模式使用
StandardScaler