
 AOP 与容器机制
# 字节码编程概述
参考文献
- 第12章:基于JDK、Cglib实现AOP切面 | 小傅哥 bugstack 虫洞栈 (opens new window)
- 实现ProxyResolver - 手写Spring - 廖雪峰的官方网站 (opens new window)
- 字节码增强技术探索 - 美团技术团队 (opens new window)
- 第01章:开篇介绍,我要带你撸 Spring 啦! | 小傅哥 bugstack 虫洞栈 (opens new window)
- SpringBoot 源码解析 (二)----- Spring Boot精髓:启动流程源码分析 - chen_hao - 博客园 (opens new window)
- SpringBoot自动装配原理,这一篇就够了! (opens new window)
字节码是由操作代码和数据对组成的二进制文件,如 Java 的 class 文件,存放的就是字节码,是处于高级语言和机器码之间的一种中间代码形式
字节码编程 ≈ 字节码增强技术,是一类对现有字节码进行修改或者动态生成全新字节码文件的技术
字节码文件格式及指令集
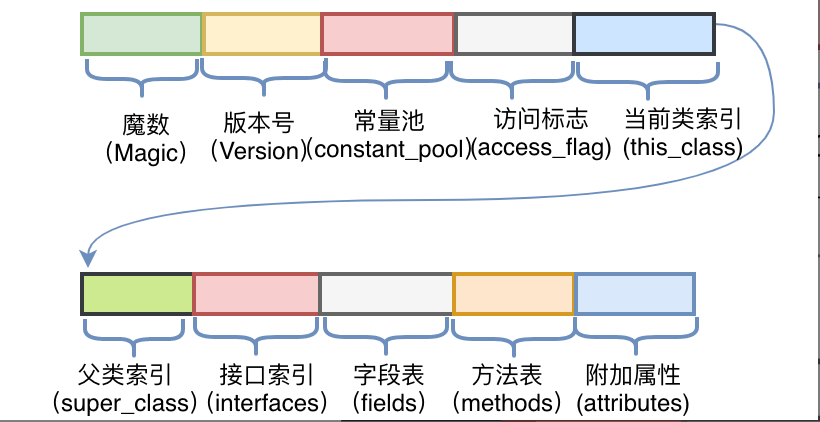
- 字节码文件由十六进制值组成,而 JVM 以两个十六进制值为一组,即以字节为单位进行读取
- JVM 规范要求每一个字节码文件都要由十部分按照固定的顺序组成,如下图所示
字节码操作类库
- CGLib:底层直接依赖 ASM 生成和修改字节码(例如生成目标类的子类字节码时,通过 ASM 的 API 操作字节码指令)
- ByteBuddy:默认情况下使用自己优化的字节码生成逻辑,但也支持通过配置切换为 ASM 作为底层引擎(不过通常无需手动指定,其内置实现已足够高效)
- Javassist:全程独立实现,不依赖任何其他字节码库,因此在设计思路和代码实现上与 ASM 完全隔离
字节码查看工具:IDEA 插件 jclasslib,代码编译后在菜单栏 “View” 中选择 “Show Bytecode With jclasslib”,可以很直观地看到当前字节码文件的类信息、常量池、方法区等信息
# CG Lib
基于 ASM 字节码生成技术实现,闷头的好活 /(ㄒoㄒ)/~~
CGLib (opens new window) 是一个基于 ASM 的开源的高性能代码生成包,使用字节码技术生成代理类,效率高于 Java 反射,为 JDK 的动态代理提供了很好的补充
这里需要明确一点
- 虽然反射同样是依靠字节码生成对象,但其核心原理是去查找对应类的 class 文件以获取类信息来构造对象;而 ASM 不一样,其在编译阶段,会基于原有类生成一个代理类的 class 文件,而通过 ASM 去创建对象,相当于直接使用这个代理类的 class 文件去创建对象,这和普通的对象创建是一样的
即“代理类一旦生成,其方法调用就是普通的 Java 方法调用,无需额外的元数据解析或安全检查,执行效率接近原生方法”,但需要注意:CGLib 无法代理 final 方法、对象、属性
使用 CGLib 根据构造函数入参创建对象
public Object instantiate(BeanDefinition beanDefinition, String beanName, Constructor<?> ctor, Object[] args) throws BeansException {
    Enhancer enhancer = new Enhancer();
    // 设置父类
    enhancer.setSuperclass(beanDefinition.getBeanClass());
    // 设置回调函数
    enhancer.setCallback(new NoOp() {
        @Override
        public int hashCode() {
            return super.hashCode();
        }
    });
    // 无参构造实例化
    if(ctor == null){
        return enhancer.create();
    }
    return enhancer.create(ctor.getParameterTypes(), args);
}
2
3
4
5
6
7
8
9
10
11
12
13
14
15
16
17
其中
setSuperclass()指定生成的代理类的父类为目标类,CGLIB 通过继承实现代理NoOp是 CGLIB 提供的空回调,表示对父类方法不做任何增强(直接调用原方法),这里匿名内部类仅重写了hashCode(),但实际逻辑还是调用父类方法,本质仍是 “无操作” 回调,如果需要 AOP 增强(如事务、日志),这里会替换为MethodInterceptor等回调实现enhancer.create()会生成代理类并调用其无参构造- 通过
create(Class[], Object[])方法带参构造实例化- 第一个参数:构造函数的参数类型数组,如
new Class[]{String.class, int.class} - 第二个参数:构造函数的参数值数组,如
new Object[]{"张三", 20}
- 第一个参数:构造函数的参数类型数组,如
这样的创建在 JDK 8 是可以默认实现的,但在 JDK 9+,由于高版本 JDK 的模块系统限制和 CGLIB 回调实现方式(没有细看不知道怎么回事)上,CGLIB 的Enhancer类会初始化失败
需要在编译命令后加上如下设置才能略过审查
--add-opens java.base/java.lang=ALL-UNNAMED
--add-opens java.base/java.lang.reflect=ALL-UNNAMED
--add-opens java.base/java.security=ALL-UNNAMED
2
3
# Byte Buddy
更上层的 API,有自己独立的字节码操纵实现,也有对 ASM 的封装,同样可以实现字节码插桩以及代理类的生成
ByteBuddy 的 AOP 实现,他接收一个泛型类 T 和一个调用拦截器 InvocationHandler,输出一个增强后代理类 T,增强的规则由 InvocationHandler 决定
public class ProxyResolver {
    // ByteBuddy实例:
    ByteBuddy byteBuddy = new ByteBuddy();

    // 传入原始Bean、拦截器,返回代理后的实例:
    public <T> T createProxy(T bean, InvocationHandler handler) {
        // 目标Bean的Class类型:
        Class<?> targetClass = bean.getClass();
        // 动态创建Proxy的Class:
        Class<?> proxyClass = this.byteBuddy
                // 子类用默认无参数构造方法:
                .subclass(targetClass, ConstructorStrategy.Default.DEFAULT_CONSTRUCTOR)
                // 拦截所有public方法:
                .method(ElementMatchers.isPublic()).intercept(InvocationHandlerAdapter.of(
                        // 新的拦截器实例:
                        new InvocationHandler() {
                            public Object invoke(Object proxy, Method method, Object[] args) throws Throwable {
                                // 将方法调用代理至原始Bean:
                                return handler.invoke(bean, method, args);
                            }
                        }))
                // 生成字节码:
                .make()
                // 加载字节码:
                .load(targetClass.getClassLoader()).getLoaded();
        // 创建Proxy实例:
        Object proxy;
        try {
            proxy = proxyClass.getConstructor().newInstance();
        } catch (RuntimeException e) {
            throw e;
        } catch (Exception e) {
            throw new RuntimeException(e);
        }
        return (T) proxy;
    }
}
2
3
4
5
6
7
8
9
10
11
12
13
14
15
16
17
18
19
20
21
22
23
24
25
26
27
28
29
30
31
32
33
34
35
36
37
38
我们定义一个调用拦截器,他会识别带有@Polite注解的方法,计算该方法的耗时并输出
public class PoliteInvocationHandler implements InvocationHandler {
    @Override
    public Object invoke(Object bean, Method method, Object[] args) throws Throwable {
        // 修改标记了@Polite的方法返回值:
        if (method.getAnnotation(Polite.class) != null) {
            long start = System.currentTimeMillis();
            try {
                return (String) method.invoke(bean, args);
            } finally {
                System.out.println("监控 - Begin By AOP");
                System.out.println("方法名称:" + invocation.getMethod().getName());
                System.out.println("方法耗时:" + (System.currentTimeMillis() - start) + "ms");
                System.out.println("监控 - End\r\n");
            }
        }
        return method.invoke(bean, args);
    }
}
2
3
4
5
6
7
8
9
10
11
12
13
14
15
16
17
18
19
而后测试一个类 OriginBean
public class OriginBean(){
    private String name;

    public OriginBean(String name){
        this.name = name;
    }

    @Polite
    public String hello(){
        return "Hi, I'm " + name;
    }
}
2
3
4
5
6
7
8
9
10
11
12
对原始类和代理类进行测试
// 原始 Bean
OriginBean origin = new OriginBean("Bob");
System.out.println(origin.hello());

// 创建 Proxy
OriginBean proxy = new ProxyResolver().createProxy(origin, new PoliteInvocationHandler());
System.out.println(proxy.hello());
2
3
4
5
6
7
将输出
Hi, I'm Bob
监控 - Begin By AOP
方法名称:hello
方法耗时:88ms
监控 - End
Hi, I'm Bob
2
3
4
5
6
# Java Agent
Java Agent 是一种 JVM 插桩机制,它允许在主程序main方法执行之前或者在 JVM 运行时进行字节码的修改和增强。这种技术对于大多数开发者来说可能比较陌生,但实际上,我们经常使用的一些工具,如 JRebel、各种线上诊断工具(btrace、greys)、以及阿里开源的线上诊断工具 arthas,都是基于 Java Agent 实现的
Java Agent 的两个应用场景
- 全链路监控,又名分布式链路追踪,目前市面的全链路监控系统基本都是参考 Google 的 Dapper (opens new window) 来做的。例如;蚂蚁金服分布式链路跟踪组件 SOFATracer、Gokit 微服务链路追踪 、Pinpoint、Prometheus(普罗米修斯)、华子的 Skywalking 等等
- RASP(Runtime Application Self-Protection),“安全左移”的应用,可抵抗 0day 漏洞
开源 RASP,卧槽度
- baidu/openrasp: 🔥Open source RASP solution (opens new window)
- jvm-rasp/jrasp-agent: 专注于JVM的运行时防御系统RASP (opens new window)
# AOP 基础
Aspect Oriented Programming,面向切面编程
通过字节码增强技术实现 AOP,并过策略模式实现三种切面的切换
- Javassist 实现
- ByteBuddy 实现
- CGLib 实现
在前文自定义的 FactoryBean 中,我们通过 InvocationHandler 实现了这样一个 getObject 方法,通过代理类返回一个 MyUserDao 对象
@Override
public MyUserDao getObject() throws Exception {
    InvocationHandler handler = (proxy, method, args) -> {

        Map<String, String> hashMap = new HashMap<>();
        hashMap.put("10001", "小傅哥");
        hashMap.put("10002", "八杯水");
        hashMap.put("10003", "阿毛");

        return "你被代理了 " + method.getName() + ":" + hashMap.get(args[0].toString());
    };
    return (MyUserDao) Proxy.newProxyInstance(Thread.currentThread().getContextClassLoader(), new Class[]{MyUserDao.class}, handler);
}
2
3
4
5
6
7
8
9
10
11
12
13
这里就是一个简单的代理实现,我们通过手动的增强方法实现了一个 MyUserDao 代理类
而 AOP 的工作就是,为用户提供一个简易的、一键式的方法增强接口,这样
可以对业务逻辑的各个部分进行隔离,从而使各模块间的业务逻辑耦合度降低,提高代码的可复用性,同时也能提高开发效率
# 方法代理
AOP 核心技术实现主要是动态代理的使用,AOP 切面的实现,本质上是在对以下代码进行封装继承
@Test
public void test_proxy_method() {
    // 目标对象(可以替换成任何的目标对象)
    Object targetObj = new UserService();
    // AOP 代理
    IUserService proxy = (IUserService) Proxy.newProxyInstance(Thread.currentThread().getContextClassLoader(), targetObj.getClass().getInterfaces(), new InvocationHandler() {
        // 方法匹配器
        MethodMatcher methodMatcher = new AspectJExpressionPointcut("execution(* com.northboat.winterframework.test.bean.IUserService.*(..))");
        @Override
        public Object invoke(Object proxy, Method method, Object[] args) throws Throwable {
            if (methodMatcher.matches(method, targetObj.getClass())) {
                // 方法拦截器
                MethodInterceptor methodInterceptor = invocation -> {
                    long start = System.currentTimeMillis();
                    try {
                        return invocation.proceed();
                    } finally {
                        System.out.println("监控 - Begin By AOP");
                        System.out.println("方法名称:" + invocation.getMethod().getName());
                        System.out.println("方法耗时:" + (System.currentTimeMillis() - start) + "ms");
                        System.out.println("监控 - End\r\n");
                    }
                };
                // 反射调用
                return methodInterceptor.invoke(new ReflectiveMethodInvocation(targetObj, method, args));
            }
            return method.invoke(targetObj, args);
        }
    });
    String result = proxy.queryUserInfo();
    System.out.println("测试结果:" + result);
}
2
3
4
5
6
7
8
9
10
11
12
13
14
15
16
17
18
19
20
21
22
23
24
25
26
27
28
29
30
31
32
在这段代码中
- 首先我们给定了一个目标类,即要被代理的类
- 而后我们的核心目标,就是创建一个目标类的代理,并且在这个代理中,对指定的方法进行“增强”
- 最后通过这个代理调用原有目标类的方法
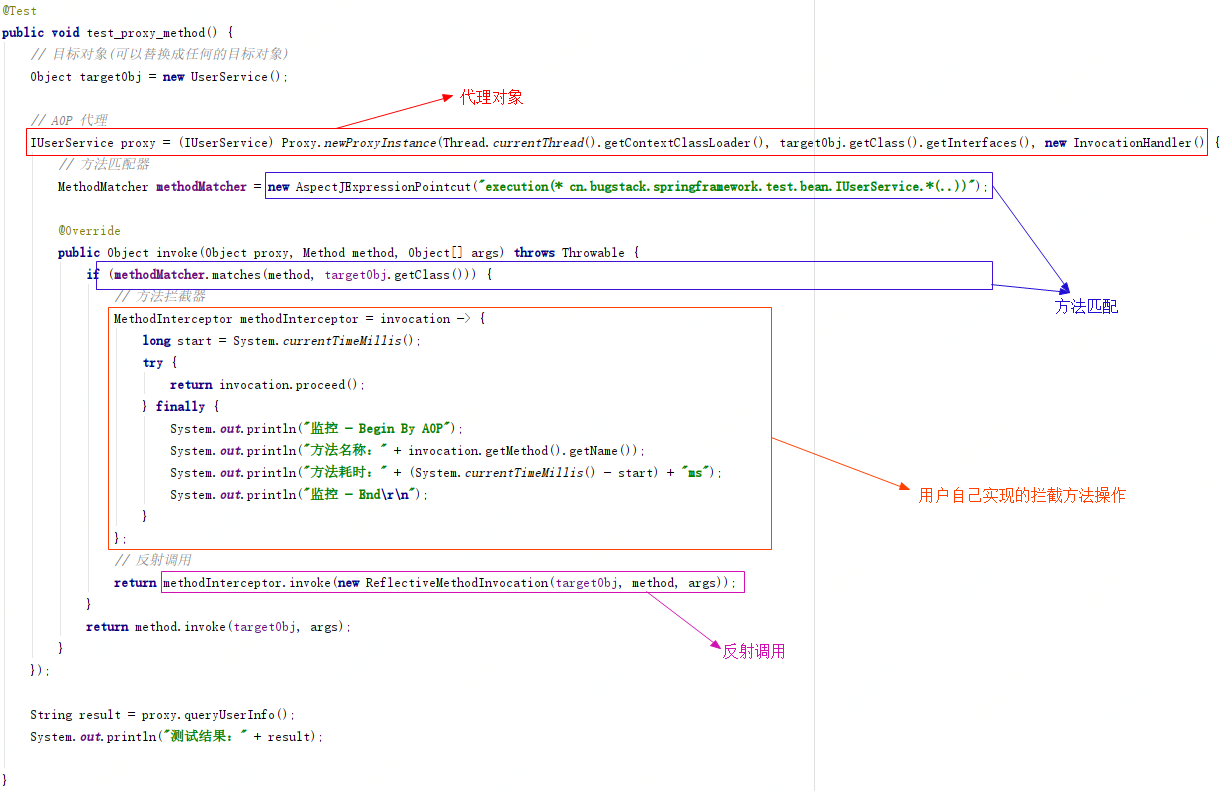
所以,AOP 的工作就是,提供一个接口,他接收
- 一个需要被代理的目标类
- 一个调用处理器 InvocationHandler
输出:一个代理对象 proxy,这个 proxy 的某些方法被改写,改写的逻辑由入参中的调用处理器决定
我们通过 Aspectj 实现类和方法的匹配,通过 Aop Alliance 实现调用处理器的重载,通过 JDK 或 CGLib 的方式进行对象的动态反射创建
Maven 依赖
<!-- https://mvnrepository.com/artifact/aopalliance/aopalliance -->
<dependency>
    <groupId>aopalliance</groupId>
    <artifactId>aopalliance</artifactId>
    <version>1.0</version>
</dependency>
<!-- https://mvnrepository.com/artifact/org.aspectj/aspectjweaver -->
<dependency>
    <groupId>org.aspectj</groupId>
    <artifactId>aspectjweaver</artifactId>
    <version>1.9.7</version>
</dependency>
<!-- Code Generation Lib -->
<dependency>
    <groupId>cglib</groupId>
    <artifactId>cglib</artifactId>
    <version>3.3.0</version> <!-- Use the latest version -->
</dependency>
2
3
4
5
6
7
8
9
10
11
12
13
14
15
16
17
18
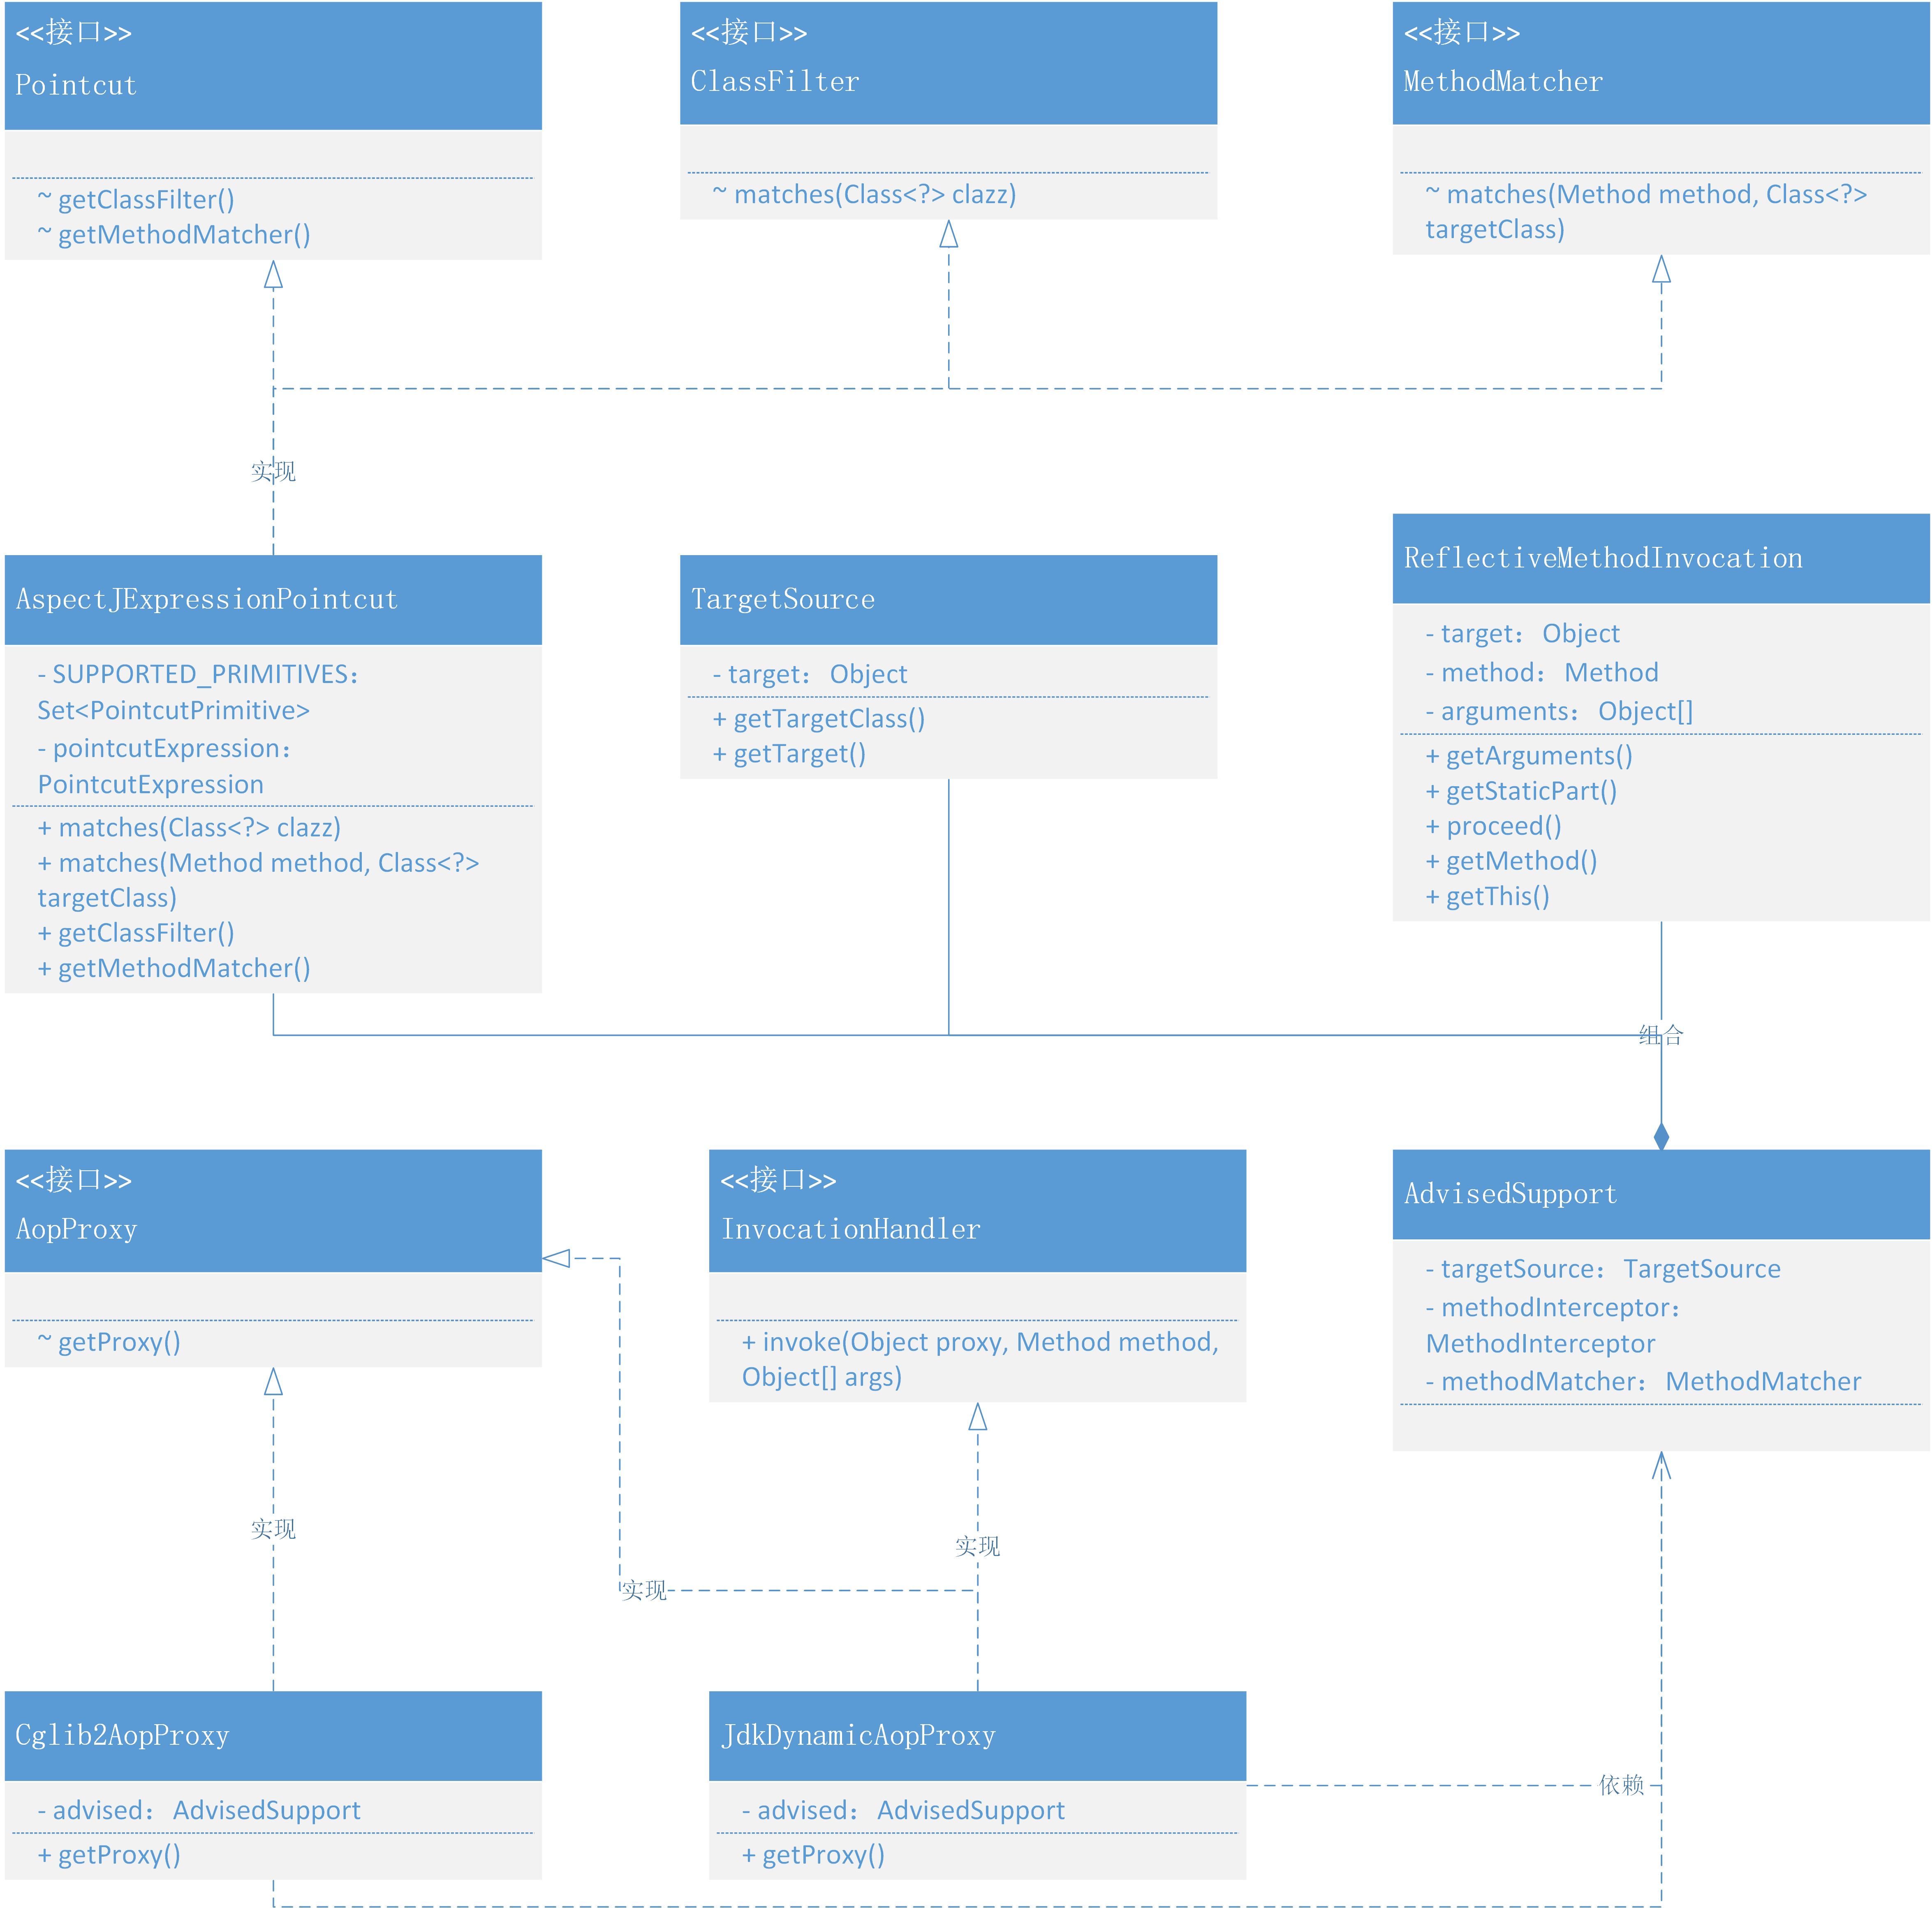
如何将上述功能拆解为简洁的 API 实现方法增强呢?这是一个十分工程化的问题
在 Spring 族系中,AOP 的继承关系图大致如下
# 类与方法的匹配
类与方法的匹配,是为了给 AOP 找到类的切入点,即从哪个类的哪个方法进行增强
Pointcut 提供两个 get 方法,分获获取 ClassFilter 和 MethodMatcher,这两个类分别用于类和方法的匹配
- ClassFilter:
matches(Class clazz)判断传入类是否与自身匹配 - MethodMatcher:
methodMatcher.matches(method, targetObj.getClass())判断传入的方法和类是否和自身匹配
定义切点表达式就是在同时实现上述三个接口
- Pointcur 中的两个 get 方法的重载有点意思,这两个 get 分别返回中返回 ClassFilter 和 MethodMatcher,而在切点表达式中直接 return this 就可以了(因为他自己继承了这两个类)
他接收一个类的位置信息,而后实现类和方法的匹配
com.northboat.winterframework.aop.aspectj.AspectJExpressionPointcut
public class AspectJExpressionPointcut implements Pointcut, ClassFilter, MethodMatcher {

    private static final Set<PointcutPrimitive> SUPPORTED_PRIMITIVES = new HashSet<PointcutPrimitive>();

    static {
        SUPPORTED_PRIMITIVES.add(PointcutPrimitive.EXECUTION);
    }

    private final PointcutExpression pointcutExpression;

    public AspectJExpressionPointcut(String expression) {
        PointcutParser pointcutParser = PointcutParser.getPointcutParserSupportingSpecifiedPrimitivesAndUsingSpecifiedClassLoaderForResolution(SUPPORTED_PRIMITIVES, this.getClass().getClassLoader());
        pointcutExpression = pointcutParser.parsePointcutExpression(expression);
    }

    @Override
    public boolean matches(Class<?> clazz) {
        return pointcutExpression.couldMatchJoinPointsInType(clazz);
    }

    @Override
    public boolean matches(Method method, Class<?> targetClass) {
        return pointcutExpression.matchesMethodExecution(method).alwaysMatches();
    }

    @Override
    public ClassFilter getClassFilter() {
        return this;
    }

    @Override
    public MethodMatcher getMethodMatcher() {
        return this;
    }
}
2
3
4
5
6
7
8
9
10
11
12
13
14
15
16
17
18
19
20
21
22
23
24
25
26
27
28
29
30
31
32
33
34
35
对类和方法的匹配测试
@Test
public void test_aop() throws NoSuchMethodException {
    AspectJExpressionPointcut pointcut = new AspectJExpressionPointcut("execution(* com.northboat.winterframework.test.bean.UserService.*(..))");
    Class<UserService> clazz = UserService.class;
    Method method = clazz.getDeclaredMethod("queryUserInfo");

    // 类匹配
    System.out.println(pointcut.matches(clazz));
    // 类方法匹配
    System.out.println(pointcut.matches(method, clazz));
}
2
3
4
5
6
7
8
9
10
11
输出两个 true,说明类和类中方法均匹配成功
# 封装切面信息
把代理、拦截、匹配的各项属性包装到一个类中,方便在 Proxy 实现类进行使用
com.northboat.winterframework.aop.AdvisedSupport
public class AdvisedSupport {

    // 被代理的目标对象
    private TargetSource targetSource;
    // 方法拦截器
    private MethodInterceptor methodInterceptor;
    // 方法匹配器(检查目标方法是否符合通知条件)
    private MethodMatcher methodMatcher;

    // ...get/set
}
2
3
4
5
6
7
8
9
10
11
其中 TargetSource 维护了一个 Object 实例
com.northboat.winterframework.aop.TargetSource
public class TargetSource {
    private final Object target;
    public TargetSource(Object target) {
        this.target = target;
    }

	// 获取目标对象实现的所有接口类型
    public Class<?>[] getTargetClass(){
        return this.target.getClass().getInterfaces();
    }

    public Object getTarget(){
        return this.target;
    }
}
2
3
4
5
6
7
8
9
10
11
12
13
14
15
# 代理实现与测试
定义接口
com.northboat.winterframework.aop.framework.AopProxy
public interface AopProxy {
    Object getProxy();
}
2
3
Jdk 的 AOP 代理实现,同时继承 AopProxy 和 InvocationHandler:把代理对象 getProxy 和反射调用 invoke 分开处理
public class JdkDynamicAopProxy implements AopProxy, InvocationHandler {
    private final AdvisedSupport advised;

    public JdkDynamicAopProxy(AdvisedSupport advised) {
        this.advised = advised;
    }

    @Override
    public Object getProxy(){
        return Proxy.newProxyInstance(Thread.currentThread().getContextClassLoader(), advised.getTargetSource().getTargetClass(), this);
    }

    @Override
    public Object invoke(Object proxy, Method method, Object[] args) throws Throwable {
        if (advised.getMethodMatcher().matches(method, advised.getTargetSource().getTarget().getClass())) {
            MethodInterceptor methodInterceptor = advised.getMethodInterceptor();
            return methodInterceptor.invoke(new ReflectiveMethodInvocation(advised.getTargetSource().getTarget(), method, args));
        }
        return method.invoke(advised.getTargetSource().getTarget(), args);
    }
}
2
3
4
5
6
7
8
9
10
11
12
13
14
15
16
17
18
19
20
21
这里用到了一个类 ReflectiveMethodInvocation,invocation 是调用的意思,这是 AOP Alliance 提供的一个方法调用接口,由 MethodInterceptor 的 invoke 方法去触发
CGLib 的 AOP Proxy 实现,实现接口 AopProxy 的 getProxy 方法,和 ByteBuddy 的逻辑类似,最终的产出都是一个代理类 Object,并且这里的泛型强转丢到外面去实现
public class Cglib2AopProxy implements AopProxy {

    private final AdvisedSupport advised;

    public Cglib2AopProxy(AdvisedSupport advised) {
        this.advised = advised;
    }

    @Override
    public Object getProxy() {
        Enhancer enhancer = new Enhancer();
        enhancer.setSuperclass(advised.getTargetSource().getTarget().getClass());
        enhancer.setInterfaces(advised.getTargetSource().getTargetClass());
        enhancer.setCallback(new DynamicAdvisedInterceptor(advised));
        return enhancer.create();
    }

    private static class DynamicAdvisedInterceptor implements MethodInterceptor {

        private final AdvisedSupport advised;

        public DynamicAdvisedInterceptor(AdvisedSupport advised) {
            this.advised = advised;
        }

        @Override
        public Object intercept(Object o, Method method, Object[] objects, MethodProxy methodProxy) throws Throwable {
            CglibMethodInvocation methodInvocation = new CglibMethodInvocation(advised.getTargetSource().getTarget(), method, objects, methodProxy);
            if (advised.getMethodMatcher().matches(method, advised.getTargetSource().getTarget().getClass())) {
                return advised.getMethodInterceptor().invoke(methodInvocation);
            }
            return methodInvocation.proceed();
        }
    }

    private static class CglibMethodInvocation extends ReflectiveMethodInvocation {

        private final MethodProxy methodProxy;

        public CglibMethodInvocation(Object target, Method method, Object[] arguments, MethodProxy methodProxy) {
            super(target, method, arguments);
            this.methodProxy = methodProxy;
        }

        @Override
        public Object proceed() throws Throwable {
            return this.methodProxy.invoke(this.target, this.arguments);
        }

    }
}
2
3
4
5
6
7
8
9
10
11
12
13
14
15
16
17
18
19
20
21
22
23
24
25
26
27
28
29
30
31
32
33
34
35
36
37
38
39
40
41
42
43
44
45
46
47
48
49
50
51
测试代理
测试目标类 UserService
public class UserService implements IUserService {

    @Override
    public String queryUserInfo() {
        try {
            Thread.sleep(new Random(1).nextInt(100));
        } catch (InterruptedException e) {
            e.printStackTrace();
        }
        return "北船,100001,深圳";
    }

    @Override
    public String register(String userName) {
        try {
            Thread.sleep(new Random(1).nextInt(100));
        } catch (InterruptedException e) {
            e.printStackTrace();
        }
        return "注册用户:" + userName + " success!";
    }
}
2
3
4
5
6
7
8
9
10
11
12
13
14
15
16
17
18
19
20
21
22
实现拦截器 UserServiceInterceptor
public class UserServiceInterceptor implements MethodInterceptor {

    @Override
    public Object invoke(MethodInvocation invocation) throws Throwable {
        long start = System.currentTimeMillis();
        try {
            return invocation.proceed();
        } finally {
            System.out.println("监控 - Begin By AOP");
            System.out.println("方法名称:" + invocation.getMethod());
            System.out.println("方法耗时:" + (System.currentTimeMillis() - start) + "ms");
            System.out.println("监控 - End\r\n");
        }
    }
}
2
3
4
5
6
7
8
9
10
11
12
13
14
15
代理类测试(懒得给 CGLib 加编译参数了)
    @Test
    public void test_dynamic() {
        // 目标对象
        IUserService userService = new UserService();

        // 组装代理信息
        AdvisedSupport advisedSupport = new AdvisedSupport();
        advisedSupport.setTargetSource(new TargetSource(userService));
        advisedSupport.setMethodInterceptor(new UserServiceInterceptor());
        advisedSupport.setMethodMatcher(new AspectJExpressionPointcut("execution(* com.northboat.winterframework.test.bean.IUserService.*(..))"));

        // 代理对象(JdkDynamicAopProxy)
        IUserService proxy_jdk = (IUserService) new JdkDynamicAopProxy(advisedSupport).getProxy();
        // 测试调用
        System.out.println("测试结果:" + proxy_jdk.queryUserInfo());

//        // 代理对象(Cglib2AopProxy)
//        IUserService proxy_cglib = (IUserService) new Cglib2AopProxy(advisedSupport).getProxy();
//        // 测试调用
//        System.out.println("测试结果:" + proxy_cglib.register("花花"));
    }
2
3
4
5
6
7
8
9
10
11
12
13
14
15
16
17
18
19
20
21
输出
监控 - Begin By AOP
方法名称:public abstract java.lang.String com.northboat.winterframework.test.bean.IUserService.queryUserInfo()
方法耗时:92ms
监控 - End

测试结果:北船,100001,深圳
2
3
4
5
6
# AOP in Spring
将 AOP 整合到 Spring Bean 的生命周期
1、把 AOP 扩展到 Bean 的生命周期,核心思路为
- 借助 BeanPostProcessor 把动态代理融入到 Bean 的生命周期中
- 组装各项切点、拦截、前置的功能和适配对应的代理器
2、自动扫描 Bean 对象进行注入,注解的书写
@Target(ElementType.TYPE)
@Retention(RetentionPolicy.RUNTIME)
@Documented
public @interface Component {
    String value() default "";
}

@Component("userService")
public class UserService implements IUserService {
	//...//
}
2
3
4
5
6
7
8
9
10
11
定义扫描器扫描 Class 类注解 Annotation
private String resolveBeanScope(BeanDefinition beanDefinition) {
    Class<?> beanClass = beanDefinition.getBeanClass();
    Scope scope = beanClass.getAnnotation(Scope.class);
    if (null != scope) return scope.value();
    return StrUtil.EMPTY;
}
2
3
4
5
6
而后将 spring.xml 转为 spring-scan.xml,指定 bean 的存放空间,进行整个包的扫描注册
<?xml version="1.0" encoding="UTF-8"?>
<beans>
    <context:component-scan base-package="com.northboat.winterframework.test.bean"/>
</beans>
2
3
4
3、通过注解注入属性信息:实现@Value和@Autowired注解
- 将
xml → applyPropertyValues转为@Value → applyPropertyValues - 将
xml → getBean转为@Autowired → getBean
4、给代理对象的属性设置初始值
- 在创建 Bean 对象
createBean的生命周期中,有一个阶段是在 Bean 对象属性填充完成以后,执行 Bean 的初始化方法和 BeanPostProcessor 的前置和后置处理,例如:感知 Aware 对象、处理 init-method 方法等。那么在这个阶段的BeanPostProcessor After就可以用于创建代理对象操作 - 在 DefaultAdvisorAutoProxyCreator 用于创建代理对象的操作中,需要把创建操作从 postProcessBeforeInstantiation 方法中迁移到 postProcessAfterInitialization,这样才能满足 Bean 属性填充后的创建操作
# Spring 自动装配原理
DI(Dependency Injection)依赖注入
# SpringBootApplication
什么是 SpringBoot 的自动装配?
在原始的 Spring 中,存在两种配置方式:基于 XML 的配置和基于 JavaConfig 类的配置方式
- 前者使用 ClassPathXmlApplicationContext 来加载配置文件,然后获取 Bean,类似于我们手写的 IoC 容器的实现
- 后者通过
@Configuration注解实现 Bean 的注入,类似于AOP 切面 - AOP in Spring - 定义扫描器扫描 Class 类注解 Annotation中的实现
而在 SpringBoot 中,一行注解@SpringBootApplication就搞定了 Bean 的装配,如何实现的?
- 自动装配的对象:BeanDefinition
对于一个空的 SpringBoot 项目,仅有一个启动类,并且启动类上有唯一的一个注解@SpringBootApplication
这个注解其实由 n 多注解组成,我们只关注主要的三个
@SpringBootConfiguration
@EnableAutoConfiguration
@ComponentScan
2
3
# Config 与 Scan
@SpringBootConfiguration
一个 JavaConfig 配置类,用来配置 bean,所以有了这个注解之后,就可以在 SpringBoot 的运行主类中使用@Bean标签配置类
@SpringBootApplication
public class BootautowireApplication{
    public static void main(String[] args){
        SpringApplication.run(BootautowireApplication.class, args);
    }

    @Bean
    public A a(){
        return new A();
    }
}
2
3
4
5
6
7
8
9
10
11
@ComponentScan
扫描组件,规定将扫描 SpringBoot 启动类的当前目录和所以子目录中的 class 文件
如对于项目com.northboat.winterframework.WinterframeworkApplication.java,其扫描目录就是com.northboat.winterframework
# EnableAutoConfiguration
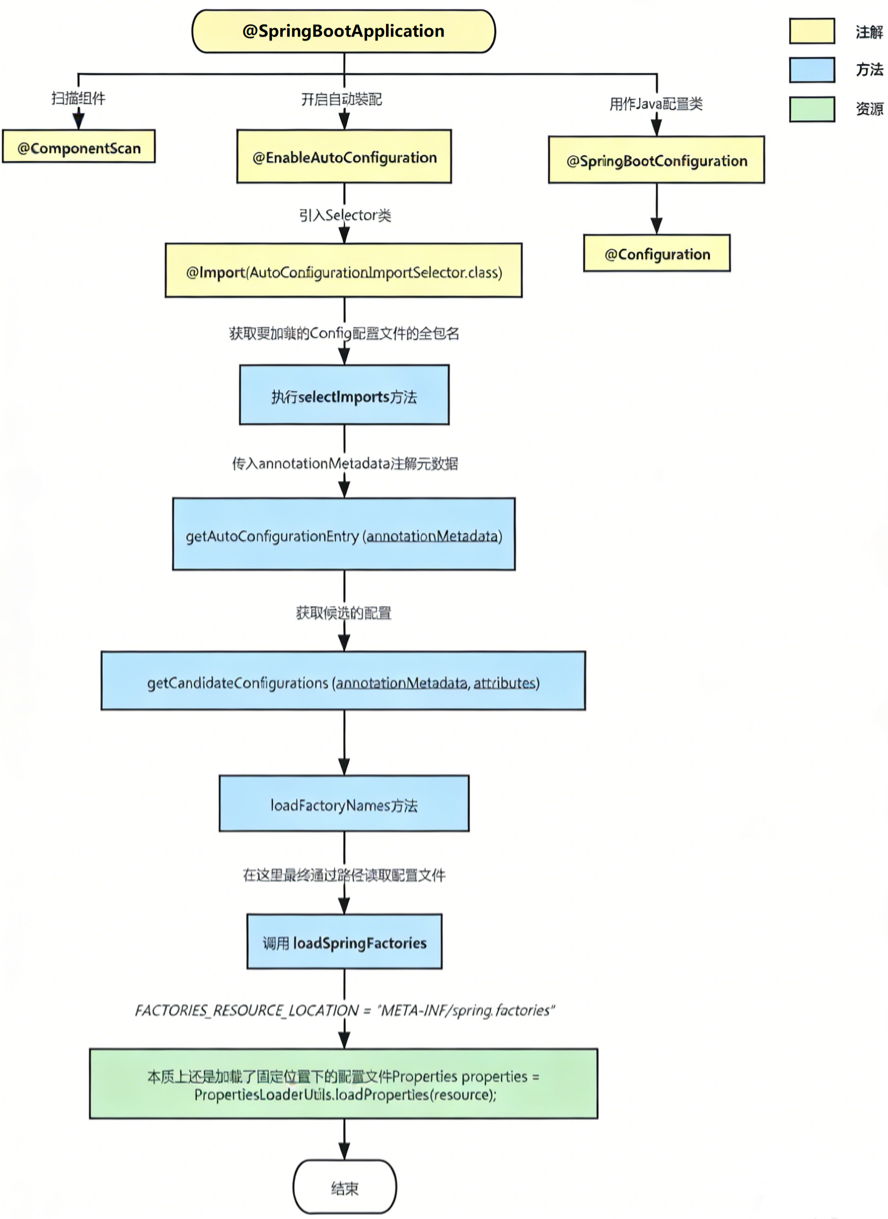
@EnableAutoConfiguration 是最为核心的一个组件,控制配置文件的加载,注解的解析,BeanDefinition 的注入等诸多流程
- 本质上还是加载了固定位置下的配置文件进行 loadProperties
自动装配的本质
- SpringBoot 自动装配的本质就是通过 Spring 去读取 META-INF/spring.factories 中保存的配置类文件然后加载 bean 定义的过程
- 如果是标了 @Configuration 注解,就是批量加载了里面的 bean 定义
- 如何实现”自动“:通过配置文件获取对应的批量配置类,然后通过配置类批量加载 bean 定义,只要有写好的配置文件 spring.factories 就实现了自动
# 容器事件和事件监听器
在 Spring 中有一个 Event 事件功能,它可以提供事件的定义、发布以及监听事件来完成一些自定义的动作,这是一个向外的接口,Spring 仅提供事件的发送接口,而具体的下游实现由用户自定义实现,这样完成 Spring 容器事件的解耦
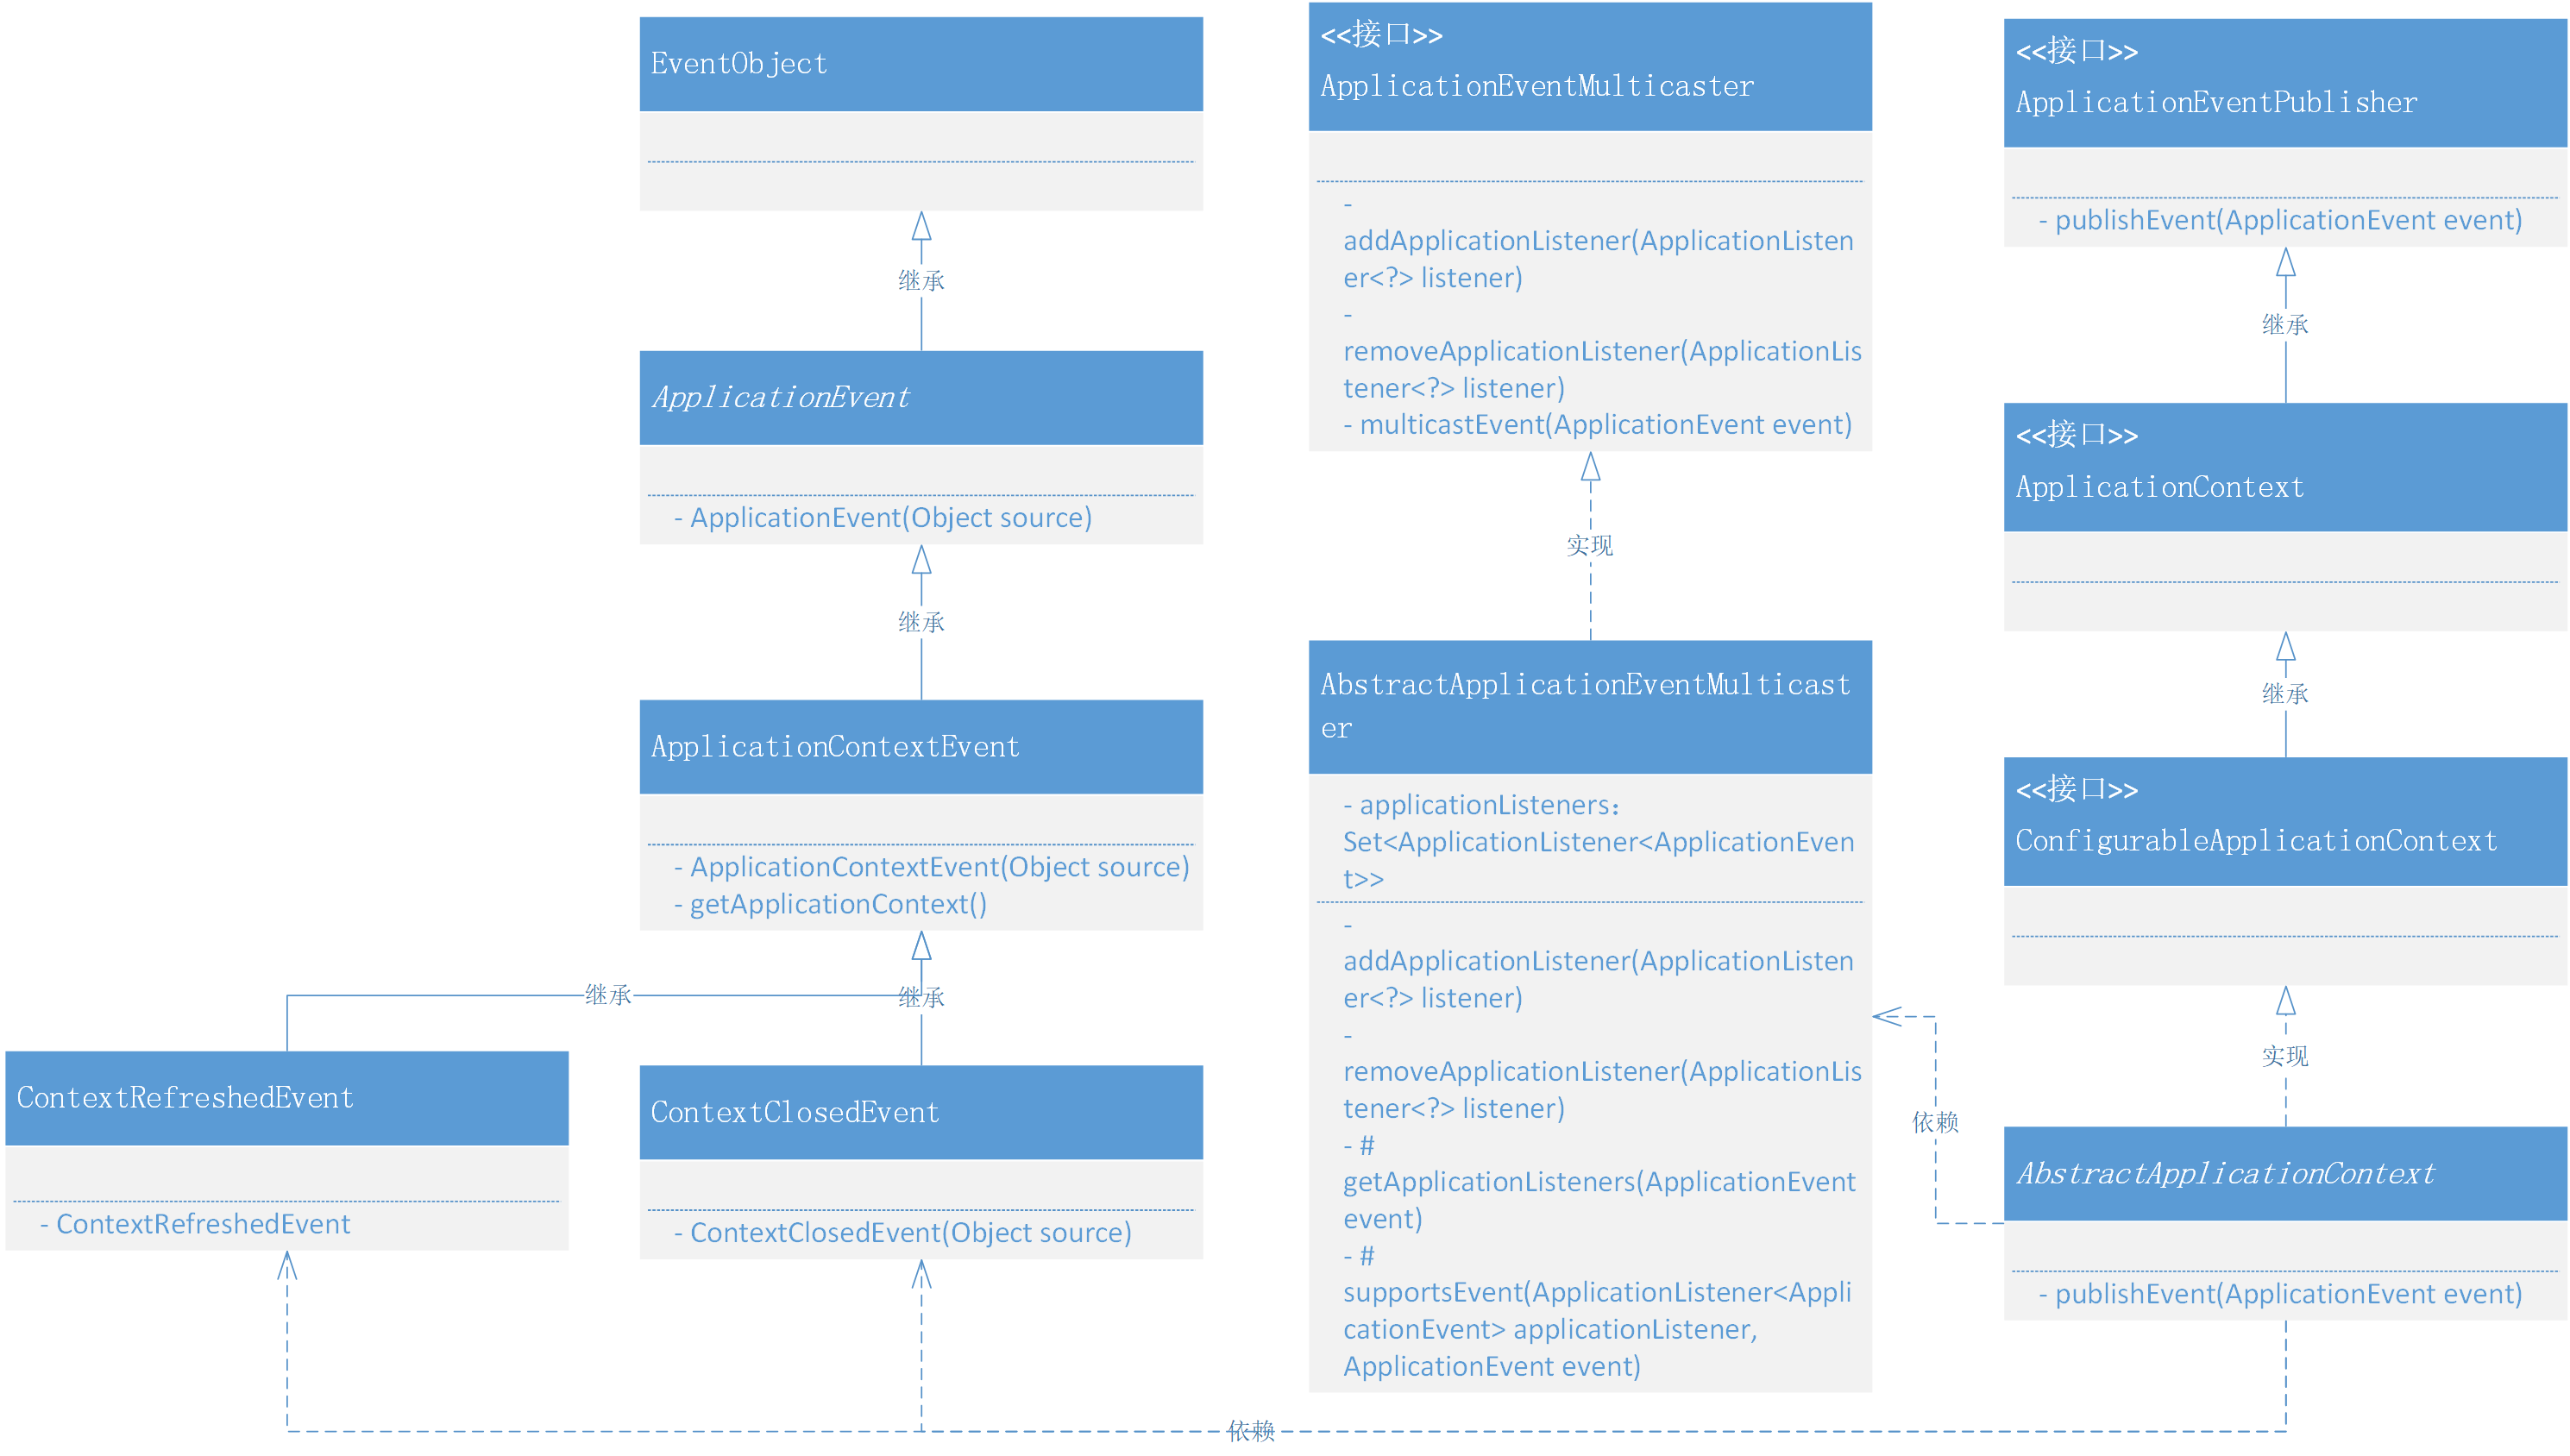
扩展 ApplicationContext 容器,引入 event 系接口,以提供完善的事件发布和事件监听功能
- ApplicationEventMulticaster 接口是注册监听器和发布事件的抽象接口
- ApplicationContextEvent 是事件接口,用于继承实现自定义事件,监听器将通过 Class 类型来分辨事件
Event 系接口与上下文 Context 的继承接入关系如下图所示
# 定义容器事件
按照 Spring 的一贯编码习惯,先开一个接口作为事件定义(这是一个代理模式的实现)
com.northboat.winterframework.context.ApplicationEvent
// EventObject 是 java.util 包中的类,继承了序列化接口
public abstract class ApplicationEvent extends EventObject {
    public ApplicationEvent(Object source) {
        super(source);
    }
}
2
3
4
5
6
而后封装一个中间层,实现一些 set 或 get 方法,完成类的初始化工作
com.northboat.winterframework.context.event.ApplicationEvent
public class ApplicationContextEvent extends ApplicationEvent {

    public ApplicationContextEvent(Object source) {
        super(source);
    }

    public final ApplicationContext getApplicationContext(){
        return (ApplicationContext) getSource();
    }
}
2
3
4
5
6
7
8
9
10
再根据具体需求,把最后的逻辑定义在更下一层的实现类
com.northboat.winterframework.context.event.ContextClosedEvent
public class ContextClosedEvent extends ApplicationContextEvent {
    public ContextClosedEvent(Object source) {
        super(source);
    }
}
2
3
4
5
com.northboat.winterframework.context.event.ContextRefreshedEvent
public class ContextRefreshedEvent extends ApplicationContextEvent {
    public ContextRefreshedEvent(Object source) {
        super(source);
    }
}
2
3
4
5
# 事件广播器
定义监听器,这里采用泛型的方式接收 ApplicationEvent 的实现类,并扩展 java.util.EventListener 提供监听接口
com.northboat.winterframework.context.ApplicationListener
public interface ApplicationListener<E extends ApplicationEvent> extends EventListener {

    void onApplicationEvent(E event);
}
2
3
4
定义上层的广播器接口,提供监听器的注册销毁以及事件广播的接口
com.northboat.winterframework.context.event.ApplicationEventMulticaster
public interface ApplicationEventMulticaster {
    // 添加监听器
    void addApplicationListener(ApplicationListener<?> listener);

    // 移除监听器
    void removeApplicationListener(ApplicationListener<?> listener);

    // 向所有监听器广播事件
    void multicastEvent(ApplicationEvent event);
}
2
3
4
5
6
7
8
9
10
在下层实现广播器,通过Set<ApplicationListener>维护监听器,实现 set/get 方法,并且增加对 BeanFactory 的感知
com.northboat.winterframework.context.event.AbstractApplicationEventMulticaster
public abstract class AbstractApplicationEventMulticaster implements ApplicationEventMulticaster, BeanFactoryAware {

    public final Set<ApplicationListener<ApplicationEvent>> applicationListeners = new LinkedHashSet<>();

    private BeanFactory beanFactory;

    @Override
    public void setBeanFactory(BeanFactory beanFactory) throws BeansException {
        this.beanFactory = beanFactory;
    }

    @Override
    public void addApplicationListener(ApplicationListener<?> listener) {
        applicationListeners.add((ApplicationListener<ApplicationEvent>) listener);
    }

    @Override
    public void removeApplicationListener(ApplicationListener<?> listener) {
        applicationListeners.remove(listener);
    }
}
2
3
4
5
6
7
8
9
10
11
12
13
14
15
16
17
18
19
20
21
一个重要的 get 方法,获取所有对入参事件感兴趣的监听器
protected Collection<ApplicationListener<?>> getApplicationListeners(ApplicationEvent event) {
    LinkedList<ApplicationListener<?>> allListeners = new LinkedList<>();
    for (ApplicationListener<ApplicationEvent> listener : applicationListeners) {
        if (supportsEvent(listener, event)) {
            allListeners.add(listener);
        }
    }
    return allListeners;
}

// 判断监听器是否对事件感兴趣
protected boolean supportsEvent(ApplicationListener<ApplicationEvent> applicationListener, ApplicationEvent event) {
    Class<? extends ApplicationListener> listenerClass = applicationListener.getClass();

    // 判断类的实例化类型
    Class<?> targetClass = ClassUtils.isCglibProxyClass(listenerClass) ? listenerClass.getSuperclass() : listenerClass;
    Type genericInterface = targetClass.getGenericInterfaces()[0];

    Type actualTypeArgument = ((ParameterizedType) genericInterface).getActualTypeArguments()[0];
    String className = actualTypeArgument.getTypeName();
    Class<?> eventClassName;
    try{
        eventClassName = Class.forName(className);
    } catch (ClassNotFoundException e){
        throw new BeansException("Wrong event class name: " + className);
    }

    return eventClassName.isAssignableFrom(event.getClass());
}
2
3
4
5
6
7
8
9
10
11
12
13
14
15
16
17
18
19
20
21
22
23
24
25
26
27
28
29
- 判定此 eventClassName 对象所表示的类或接口与指定的 event.getClass() 参数所表示的类或接口是否相同,或是否是其超类或超接口
isAssignableFrom是用来判断子类和父类的关系的,或者接口的实现类和接口的关系的,默认所有的类的终极父类都是 Object,如果A.isAssignableFrom(B)结果是 true,证明 B 可以转换成为 A,也就是 A 可以由 B 转换而来
还剩下一个multicastEvent广播函数由再下一层的SimpleApplicationEventMulticaster实现
其实很简单,因为 Multicaster 维护了所有监听器,那么当收到事件后,将这个事件与所有监听器比对,谁监听这类事件,那么就执行他的 onApplicationEvent 方法
public class SimpleApplicationEventMulticaster extends AbstractApplicationEventMulticaster{

    public SimpleApplicationEventMulticaster(BeanFactory beanFactory) {
        setBeanFactory(beanFactory);
    }

    // 就是对监听器的一个遍历,符合对应事件的执行 onApplicationEvent 方法
    @Override
    public void multicastEvent(ApplicationEvent event) {
        for(final ApplicationListener listener : getApplicationListeners(event)){
            listener.onApplicationEvent(event);
        }
    }
}
2
3
4
5
6
7
8
9
10
11
12
13
14
# 定义和实现事件发布者
同样给一个最上层接口 Publisher
com.northboat.winterframework.context.ApplicationEventPublisher
public interface ApplicationEventPublisher {
    // 发布事件接口
    void publishEvent(ApplicationEvent event);
}
2
3
4
接入publishEvent接口
com.northboat.winterframework.context.ApplicationContext
public interface ApplicationContext extends ListableBeanFactory, ApplicationEventPublisher {
}
2
在AbstractApplicationContext中
- 注入广播器
SimpleApplicationEventMulticaster - 通过上者实现
publishEvent接口,将事件的创建、监听和广播逻辑糅合到上下文里
public abstract class AbstractApplicationContext extends DefaultResourceLoader implements ConfigurableApplicationContext {

    public static final String APPLICATION_EVENT_MULTICASTER_BEAN_NAME = "applicationEventMulticaster";

    private ApplicationEventMulticaster applicationEventMulticaster;

    @Override
    public void refresh() throws BeansException {
        // 创建 beanFactory 并加载 BeanDefinition
        refreshBeanFactory();

        // 获取 beanFactory
        ConfigurableListableBeanFactory beanFactory = getBeanFactory();

        // 载入上下文感知器
        beanFactory.addBeanPostProcessor(new ApplicationContextAwareProcessor(this));

        // 在 Bean 实例化前执行 BeanFactoryPostProcessor 的修改 BeanDefinition 操作
        invokeBeanFactoryPostProcessors(beanFactory);

        // 注册 BeanPostProcessor
        registerBeanPostProcessors(beanFactory);

        // 初始化事件发布者
        initApplicationEventMulticaster();

        // 注册事件监听器
        registerListeners();

        // 实例化
        beanFactory.preInstantiateSingletons();

        // 发布容器刷新完成事件
        finishRefresh();
    }

    private void initApplicationEventMulticaster() {
        ConfigurableListableBeanFactory beanFactory = getBeanFactory();
        applicationEventMulticaster = new SimpleApplicationEventMulticaster(beanFactory);
        beanFactory.registerSingleton(APPLICATION_EVENT_MULTICASTER_BEAN_NAME, applicationEventMulticaster);
    }

    private void registerListeners() {
        Collection<ApplicationListener> applicationListeners = getBeansOfType(ApplicationListener.class).values();
        for (ApplicationListener listener : applicationListeners) {
            applicationEventMulticaster.addApplicationListener(listener);
        }
    }

    private void finishRefresh() {
        publishEvent(new ContextRefreshedEvent(this));
    }

    @Override
    public void publishEvent(ApplicationEvent event) {
        applicationEventMulticaster.multicastEvent(event);
    }
}
2
3
4
5
6
7
8
9
10
11
12
13
14
15
16
17
18
19
20
21
22
23
24
25
26
27
28
29
30
31
32
33
34
35
36
37
38
39
40
41
42
43
44
45
46
47
48
49
50
51
52
53
54
55
56
57
58
# 创建事件和监听器
通过继承ApplicationContextEvent自定义一个事件
public class CustomEvent extends ApplicationContextEvent {

    private Long id;
    private String message;

    public CustomEvent(Object source, Long id, String message) {
        super(source);
        this.id = id;
        this.message = message;
    }

    // ...get/set
}
2
3
4
5
6
7
8
9
10
11
12
13
同样的,实现ApplicationListener接口自定义一个监听器去监听上述的自定义事件CustomEvent,以及实现两个监听 RefreshEvent 和 ContextClosedEvent 的监听器
public class CustomEventListener implements ApplicationListener<CustomEvent> {

    @Override
    public void onApplicationEvent(CustomEvent event) {
        System.out.println("收到:" + event.getSource() + "消息;时间:" + new Date());
        System.out.println("消息:" + event.getId() + ":" + event.getMessage());
    }

}

public class ContextRefreshedEventListener implements ApplicationListener<ContextRefreshedEvent> {

    @Override
    public void onApplicationEvent(ContextRefreshedEvent event) {
        System.out.println("刷新事件:" + this.getClass().getName());
    }
}

public class ContextClosedEventListener implements ApplicationListener<ContextClosedEvent> {

    @Override
    public void onApplicationEvent(ContextClosedEvent event) {
        System.out.println("关闭事件:" + this.getClass().getName());
    }
}
2
3
4
5
6
7
8
9
10
11
12
13
14
15
16
17
18
19
20
21
22
23
24
25
将监听器们作为 Bean 通过 xml 文件注入到上下文中
<?xml version="1.0" encoding="UTF-8"?>
<beans>

    <bean class="com.northboat.winterframework.test.event.ContextRefreshedEventListener"/>
    <bean class="com.northboat.winterframework.test.event.CustomEventListener"/>
    <bean class="com.northboat.winterframework.test.event.ContextClosedEventListener"/>

</beans>
2
3
4
5
6
7
8
单元测试
public class ApiTest {

    @Test
    public void test_event() {
        ClassPathXmlApplicationContext applicationContext = new ClassPathXmlApplicationContext("classpath:spring.xml");
        applicationContext.publishEvent(new CustomEvent(applicationContext, 1019129009086763L, "成功了!"));
        applicationContext.registerShutdownHook();
    }
}
2
3
4
5
6
7
8
9
测试结果
刷新事件:com.northboat.winterframework.test.event.ContextRefreshedEventListener
收到:com.northboat.winterframework.context.support.ClassPathXmlApplicationContext@16293aa2消息;时间:Mon Dec 08 20:14:27 CST 2025
消息:1019129009086763:成功了!
2
3