Servlet - Cookie
Servlet
Why Servlet
1、servlet是sun公司用于开发动态web的一门技术
2、sun公司在这些api中提供了一个接口:Servlet,要想开发一个servlet程序只需实现两步
- 编写一个java类实现Servlet接口
- 把开发好的java类部署到web上
我们把实现了Servlet接口的java程序叫做 Servlet
Hello Servlet
构建工程
构建一个干净的maven项目,删掉里面的src目录,便于在这个项目里建立Moudel,将该工程作为Maven的主工程
在maven pom文件中添加servlet依赖
<dependencies>
        <!--Servlet依赖-->
        <dependency>
            <groupId>javax.servlet</groupId>
            <artifactId>javax.servlet-api</artifactId>
            <version>4.0.1</version>
        </dependency>
    </dependencies>
2
3
4
5
6
7
8
Maven父子工程
在主工程下new module,父为干净的maven项目,子为mavenweb项目
在用模板构建maven-webapp时可能报错 No archetype found in remote catalog. Defaulting to internal catalog,即在目录中未找到模板,解决办法为
在创建maven项目时,设置属性 archetypeCatalog = internal
在主工程中可以建很多的module(模板),在主工程的pom.xml中会有
<modules>
        <module>servlet-01</module>
</modules>
1
2
3而子工程的pom.xml中会有(好像也可以没有)
<parent>
    <groupId>org.example</groupId>
    <artifactId>javaweb-servlet</artifactId>
    <version>1.0-SNAPSHOT</version>
</parent>
1
2
3
4
5父工程和子工程的关系与父类和子类相似
maven环境优化
- 修改web.xml为最新的
- 将maven的结构搭建完整
编写一个Servlet程序
- 编写一个普通类
- 实现Servlet接口:Servlet接口 ——> GenericServlet抽象类 ——> HttpServlet抽象类 ——> 继承HttpServlet ——> 实现Servlet接口
继承HttpServlet,重写doGet方法(doGet是当请求(表单提交方式)为GET时,service方法中调用的方法)
import javax.servlet.ServletException;
import javax.servlet.http.HttpServlet;
import javax.servlet.http.HttpServletRequest;
import javax.servlet.http.HttpServletResponse;
import java.io.IOException;
import java.io.PrintWriter;

public class HelloServlet extends HttpServlet {

    //由于 GET 和 POST 只是请求实现的不同方式,可以相互调用,因为业务逻辑相同
    @Override
    protected void doGet(HttpServletRequest req, HttpServletResponse resp) throws ServletException, IOException {
        PrintWriter writer = resp.getWriter();  //响应流
        writer.println("Hello Servlet!");
    }

    @Override
    protected void doPost(HttpServletRequest req, HttpServletResponse resp) throws ServletException, IOException {
        super.doPost(req, resp);
    }
}
2
3
4
5
6
7
8
9
10
11
12
13
14
15
16
17
18
19
20
21
编写Servlet映射
why refect? 我们写的java程序要通过浏览器访问,而浏览器需要连接web服务器,所以我们需要在web服务中注册我们写的servlet,还需要给他一个浏览器能访问的路径
在web.xml中配置servlet映射
<web-app>
  <display-name>Archetype Created Web Application</display-name>

  <!--配置servlet映射-->
  <servlet>
    <servlet-name>hello</servlet-name>
    <servlet-class>com.servlet.HelloServlet</servlet-class>
  </servlet>
  <servlet-mapping>
    <servlet-name>hello</servlet-name>
    <url-pattern>/hello</url-pattern>
  </servlet-mapping>

</web-app>
2
3
4
5
6
7
8
9
10
11
12
13
14
servlet-name:命名该servlet
servlet-class:你所写的servlet的包路径
servlet-name:链接你所命名的servlet(servlet-mapping中)
url-pattern:映射在localhost上的路径,如上述代码将执行在 localhost:8080/s1/hello(s1为tomcat的映射路径)(注意一定要加 / ,否则会报错子级失败啥啥)
配置tomcatsdfsda
点右上角锤锤旁边的小格格,点击+号配置tomcat,注意配置虚拟映射路径,即配置 deployment 中 application context:同样需要反斜杠,如: /s1
启动测试
servlet族系部分源码
Servlet(interface)源码:
public interface Servlet {
    //初始化
    void init(ServletConfig var1) throws ServletException;

    //获取servlet配置
    ServletConfig getServletConfig();

    //请求和响应
    void service(ServletRequest var1, ServletResponse var2) throws ServletException, IOException;

    //获取servlet信息
    String getServletInfo();

    //销毁servlet
    void destroy();
}
2
3
4
5
6
7
8
9
10
11
12
13
14
15
16
GenericServlet(abstract)源码:
public abstract class GenericServlet implements Servlet, ServletConfig, Serializable {
    private static final String LSTRING_FILE = "javax.servlet.LocalStrings";
    private static ResourceBundle lStrings = ResourceBundle.getBundle("javax.servlet.LocalStrings");
    private transient ServletConfig config;

    //这一层尚未处理的方法
    public GenericServlet() {
    }

    public void destroy() {
    }

    //重中之重
    public abstract void service(ServletRequest var1, ServletResponse var2) throws ServletException, IOException;

    //重写了一个带配置参数的初始化函数
    public void init(ServletConfig config) throws ServletException {
        this.config = config;
        this.init();
    }

    public void init() throws ServletException {
    }


    //下述一系列方法实现了servlet信息的获取
    public String getServletInfo() {
        return "";
    }

    public ServletConfig getServletConfig() {
        return this.config;
    }

    public String getInitParameter(String name) {
        ServletConfig sc = this.getServletConfig();
        if (sc == null) {
            throw new IllegalStateException(lStrings.getString("err.servlet_config_not_initialized"));
        } else {
            return sc.getInitParameter(name);
        }
    }

    public Enumeration<String> getInitParameterNames() {
        ServletConfig sc = this.getServletConfig();
        if (sc == null) {
            throw new IllegalStateException(lStrings.getString("err.servlet_config_not_initialized"));
        } else {
            return sc.getInitParameterNames();
        }
    }

    public ServletContext getServletContext() {
        ServletConfig sc = this.getServletConfig();
        if (sc == null) {
            throw new IllegalStateException(lStrings.getString("err.servlet_config_not_initialized"));
        } else {
            return sc.getServletContext();
        }
    }

    public void log(String msg) {
        this.getServletContext().log(this.getServletName() + ": " + msg);
    }

    public void log(String message, Throwable t) {
        this.getServletContext().log(this.getServletName() + ": " + message, t);
    }

    public String getServletName() {
        ServletConfig sc = this.getServletConfig();
        if (sc == null) {
            throw new IllegalStateException(lStrings.getString("err.servlet_config_not_initialized"));
        } else {
            return sc.getServletName();
        }
    }
}
2
3
4
5
6
7
8
9
10
11
12
13
14
15
16
17
18
19
20
21
22
23
24
25
26
27
28
29
30
31
32
33
34
35
36
37
38
39
40
41
42
43
44
45
46
47
48
49
50
51
52
53
54
55
56
57
58
59
60
61
62
63
64
65
66
67
68
69
70
71
72
73
74
75
76
77
78
HttpServlet(abstract)service方法源码:
protected void service(HttpServletRequest req, HttpServletResponse resp) throws ServletException, IOException {
        String method = req.getMethod();
        long lastModified;

    	//如果html表单提交方法(method)为GET
        if (method.equals("GET")) {
            lastModified = this.getLastModified(req);
            if (lastModified == -1L) {
                this.doGet(req, resp);
            } else {
                long ifModifiedSince = req.getDateHeader("If-Modified-Since");
                if (ifModifiedSince < lastModified) {
                    this.maybeSetLastModified(resp, lastModified);
                    this.doGet(req, resp);
                } else {
                    resp.setStatus(304);
                }
            }
        } else if (method.equals("HEAD")) {		//如果提交方式为HEAD
            lastModified = this.getLastModified(req);
            this.maybeSetLastModified(resp, lastModified);
            this.doHead(req, resp);
        } else if (method.equals("POST")) {		//如果提交方式为POST
            this.doPost(req, resp);
        } else if (method.equals("PUT")) {		//如果提交方式为PUT
            this.doPut(req, resp);
        } else if (method.equals("DELETE")) {		//如果提交方式为DELETE
            this.doDelete(req, resp);
        } else if (method.equals("OPTIONS")) {		//如果提交方式为OPTIONS
            this.doOptions(req, resp);
        } else if (method.equals("TRACE")) {		//如果提交方式为TRACE
            this.doTrace(req, resp);
        } else {
            String errMsg = lStrings.getString("http.method_not_implemented");
            Object[] errArgs = new Object[]{method};
            errMsg = MessageFormat.format(errMsg, errArgs);
            resp.sendError(501, errMsg);
        }

    }
2
3
4
5
6
7
8
9
10
11
12
13
14
15
16
17
18
19
20
21
22
23
24
25
26
27
28
29
30
31
32
33
34
35
36
37
38
39
40
Servlet 架构
BS架构
浏览器 <——> 服务器 <——> servlet:service(resp, resq)
Mapping
不同的映射情况
一个servlet指定一个映射
一个servlet可以指定多个映射路径
指定通用映射
<url-pattern>/*</url-pattern>

<!--效果为,你在网页上根路径中瞎几把乱输入一个未经映射的地址,页面将跳转到 /* 所映射的页面-->
2
3
- 自定义后缀配置请求映射
<url-pattern>*.NorthBoat</url-pattern>

<!--这样的效果就是,你在网页上打出任何 名字.NorthBoat 都会跳转到你在这儿规定的页面,只要以.NorthBoat结尾-->
2
3
- 5利用通配符设置404界面
由于通配符的优先级小于已指定的mapping映射
public class ErrorServlet extends HttpServlet {

    @Override
    protected void doGet(HttpServletRequest req, HttpServletResponse resp) throws ServletException, IOException {
        resp.setContentType("text/html");
        resp.setCharacterEncoding("utf-8");

        PrintWriter printWriter = resp.getWriter();
        printWriter.println("<h1>404</h1>");
    }

    @Override
    protected void doPost(HttpServletRequest req, HttpServletResponse resp) throws ServletException, IOException {
        super.doPost(req, resp);
    }
}
2
3
4
5
6
7
8
9
10
11
12
13
14
15
16
<!--404-->
<servlet>
    <servlet-name>error</servlet-name>
    <servlet-class>Servlet.ErrorServlet</servlet-class>
</servlet>
<servlet-mapping>
    <servlet-name>error</servlet-name>
    <url-pattern>/*</url-pattern>
</servlet-mapping>
2
3
4
5
6
7
8
9
wab-app编写顺序报错
报错 The content of element type "web-app" must match "(icon?,display-name?,description?
将web.xml文件前五行换为
<?xml version="1.0" encoding="UTF-8"?>
<web-app version="3.0" xmlns="http://java.sun.com/xml/ns/javaee"
	xmlns:xsi="http://www.w3.org/2001/XMLSchema-instance"
	xsi:schemaLocation="http://java.sun.com/xml/ns/javaee
	http://java.sun.com/xml/ns/javaee/web-app_3_0.xsd">
2
3
4
5
设置网页编码格式
设置响应(response)的ContentType、CharacterEncoding
在f12网络消息头中可以看到ContentType元素,其中用分号隔开了该网页的ContentType和ChacaterEncoding
在doGet方法中设置页面文字格式
protected void doGet(HttpServletRequest req, HttpServletResponse resp) throws ServletException, IOException {
        resp.setContentType("text/html");
        resp.setCharacterEncoding("utf-8");
    }
2
3
4
resp.setCharacterEncoding(String charset) 将把 charset 在已有选项中匹配对应字符格式,若未匹配到将标红报错
ServletContext
web在启动时,它会为每个web程序都创建一个对应的ServletContext对象,它代表了当前的web应用,凌驾于Servlet之上
数据共享:
ServletContext作为一个数据互通的容器,在这个Servlet中保存的数据,可以在另外一个Servlet中获取
共享三部曲:
1、创建一个放置数据的类
public class Study extends HttpServlet {
    @Override
    protected void doGet(HttpServletRequest req, HttpServletResponse resp) throws ServletException, IOException {
        //this.getInitParameterNames() 返回初始化参数
        //this.getServletConfig()   获得Servlet配置
        ServletContext context = this.getServletContext();   //servlet上下文容器
        String name = "NorthBoat";  //数据
        //将一个数据保存在ServletContext中,setAttribute:设置属性
        context.setAttribute("username", name);
    }
}
2
3
4
5
6
7
8
9
10
11
2、需要一个读取数据的类
public class Hello extends HttpServlet {

    @Override
    protected void doGet(HttpServletRequest req, HttpServletResponse resp) throws ServletException, IOException {

        String name = (String) this.getServletContext().getAttribute("username");

        resp.setContentType("text/html");
        resp.setCharacterEncoding("utf-8");
        resp.getWriter().println("<h1>你好啊," + name + "</h1>");   //相应流
    }
}
2
3
4
5
6
7
8
9
10
11
12
3、配置web.xml
  <!--读取数据的Servlet-->
  <servlet>
    <servlet-name>hello</servlet-name>
    <servlet-class>Servlet.Hello</servlet-class>
  </servlet>
  <servlet-mapping>
    <servlet-name>hello</servlet-name>
    <url-pattern>/hello</url-pattern>
  </servlet-mapping>

  <!--存储数据的Servlet-->
  <servlet>
    <servlet-name>get</servlet-name>
    <servlet-class>Servlet.Study</servlet-class>
  </servlet>
  <servlet-mapping>
    <servlet-name>get</servlet-name>
    <url-pattern>/get</url-pattern>
  </servlet-mapping>
2
3
4
5
6
7
8
9
10
11
12
13
14
15
16
17
18
19
在运行时,直接打开 /hello 将显示 ”你好啊,null“
而先打开 /get 再打开 /hello 将显示大写的 “你好啊,NorthBoat”
即先经过 get 将数据储存到了 ServletContext 中,所以 hello 能够从 ServletContext 中取到 username
获取初始化参数:
在web.xml中配置context初始化参数:如 stu:student,tea:teacher,adm:admin,在网页中获取数据组成 account
<context-param>
    <param-name>mysql</param-name>
    <param-value>jdbc:mysql://localhost:3306</param-value>
  </context-param>
2
3
4
获取context参数,getInitParameter(),以字符串返回
public class Hello extends HttpServlet{
    @Override
    protected void doGet(HttpServletRequest req, HttpServletResponse resp) throws ServletException, IOException {
        ServletContext context = this.getServletContext();
        resp.setContentType("text/html");
        resp.setCharacterEncoding("utf-8");
        //获取初始化参数
        String param = context.getInitParameter("mysql");
        //打印初始化参数
        resp.getWriter().println("初始化参数:" + param);
    }
}
2
3
4
5
6
7
8
9
10
11
12
请求转发:
将Study映射页面的请求转发到 /hello,url不发生改变,但页面内容显示 /hello 的内容
public class Study extends HttpServlet {
    @Override
    protected void doGet(HttpServletRequest req, HttpServletResponse resp) throws ServletException, IOException {
        ServletContext context = this.getServletContext();   //servlet上下文容器
        String name = "NorthBoat";  //数据

        //将一个数据保存在ServletContext中,setAttribute:设置属性
        context.setAttribute("username", name);

        //请求转发到 /hello
        context.getRequestDispatcher("/hello").forward(req, resp);
    }
}
2
3
4
5
6
7
8
9
10
11
12
13
/hello 中能读到 username,即在请求转发前已把username存到了context中,请求转发后,将不再执行 Study 中 doGet 的后续内容
public class Hello extends HttpServlet{
    @Override
    protected void doGet(HttpServletRequest req, HttpServletResponse resp) throws ServletException, IOException {
        ServletContext context = this.getServletContext();
        String name = (String)context.getAttribute("username");
        String param = context.getInitParameter("mysql");

        resp.setContentType("text/html");
        resp.setCharacterEncoding("utf-8");

        resp.getWriter().println("<h1>你好啊," + name + "</h1>");
        resp.getWriter().println("<h1>初始化参数:" + param + "</h1>");
    }
}
2
3
4
5
6
7
8
9
10
11
12
13
14
读取资源文件:
public class Hello extends HttpServlet{
    @Override
    protected void doGet(HttpServletRequest req, HttpServletResponse resp) throws ServletException, IOException {
		//获取静态资源
        Properties prop = new Properties();
        //资源路径,以流的形式加载
        InputStream is = context.getResourceAsStream("/WEB-INF/classes/database.properties");
        prop.load(is);
        String table = prop.getProperty("student");
        resp.getWriter().println("<h1>表:" + table + "</h1>");
    }

    @Override
    protected void doPost(HttpServletRequest req, HttpServletResponse resp) throws ServletException, IOException {
        doGet(req, resp);
    }
}
2
3
4
5
6
7
8
9
10
11
12
13
14
15
16
17
database.properties
student=student
teacher=teacher
admin=admin
2
3
Response
响应:web服务器接收到客户端的http请求,针对这个请求,分别创建请求的HttpServletRequest对象,代表响应的一个HttpServletResponse:
- 如果要获取客户端请求过来的参数,找Request
- 如果要给客户端响应一些信息,找Response
负责向浏览器发送数据的方法:
ServletOutputStream getOutputStream() throws IOException;
PrintWriter getWriter() throws IOException;
2
负责向浏览器发送响应头的方法:
//from ServletResponse
void setContentType(String type);
void setCharacterEncoding(String encoding);

//from HttpServletResponse
void setDateHeader(String var1, long var2);
void addDateHeader(String var1, long var2);
void setHeader(String var1, String var2);
void addHeader(String var1, String var2);
void setIntHeader(String var1, int var2);
void addIntHeader(String var1, int var2););
2
3
4
5
6
7
8
9
10
11
响应的状态码:
//运行良好
int SC_OK = 200;
//浏览器错误
int SC_FORBIDDEN = 403;
int SC_NOT_FOUND = 404;
int SC_METHOD_NOT_ALLOWED = 405;
//服务器错误
int SC_INTERNAL_SERVER_ERROR = 500;
int SC_NOT_IMPLEMENTED = 501;
int SC_BAD_GATEWAY = 502;
int SC_SERVICE_UNAVAILABLE = 503;
int SC_GATEWAY_TIMEOUT = 504;
int SC_HTTP_VERSION_NOT_SUPPORTED = 505;
2
3
4
5
6
7
8
9
10
11
12
13
应用
1、向浏览器输出消息
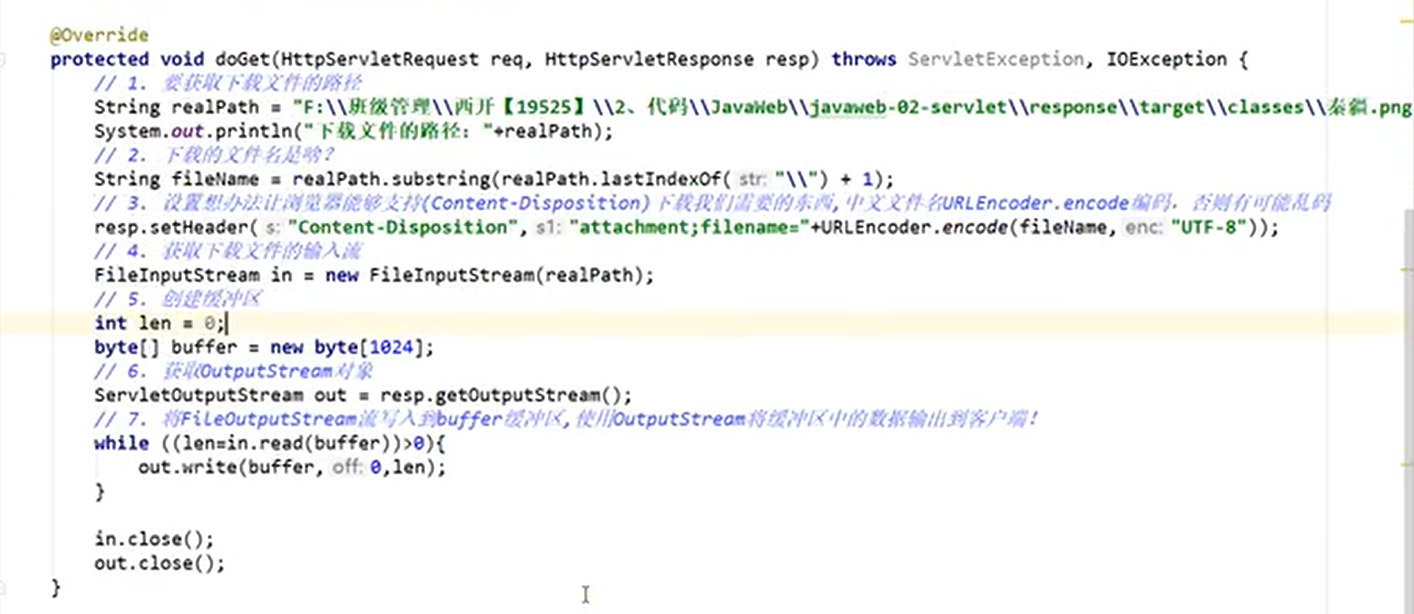
2、下载文件、上传文件
- 下载文件路径
- 文件名
- 设置浏览器支持下载我们所需的东西
- 获取下载文件的输入流
- 创建缓冲区
- 获取OutputStream对象
- 向FileOutputStream流写入buffer缓冲区
- 将缓存区中的数据输出到客户端
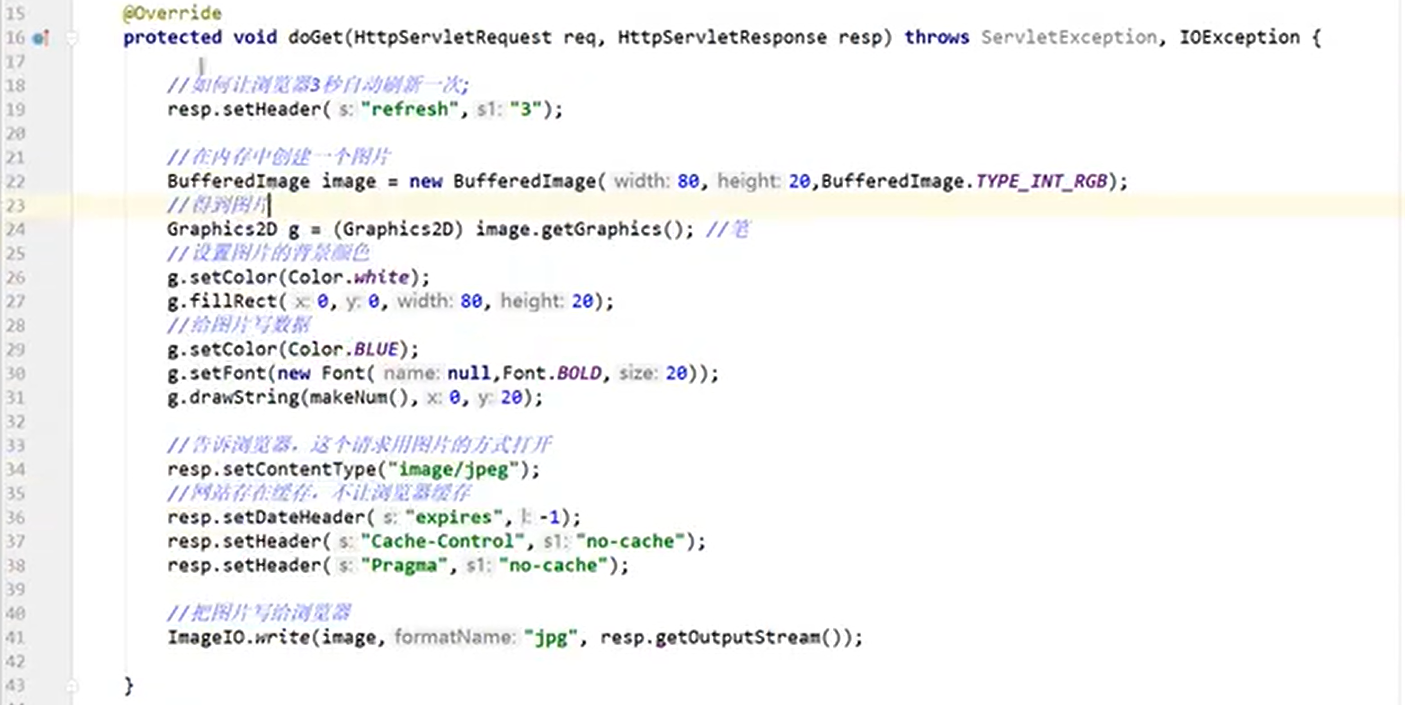
3、以图片形式生成验证码
生成随机“数”,当生成的数不足7位时,用0填充(老程序员的常用套路)
private String makeNUm(){
    Random random = new Random();
    String num = random.nextInt(9999999) + "";
    StringBuffer sb = new StringBuffer();
    for(int i = 0; i < 7-num.length(); i++){
        sb.append("0");
    }
    num = sb.toString() + num;
    return num;
}
2
3
4
5
6
7
8
9
10
编辑图片并映射到网页上
4、重定向
protected void doGet(HttpServletRequest req, HttpServletResponse resp) throws IOException{
    resp.sentRedirect("/NEUQHelper/hello/Login");
}
2
3
重定向的实现原理
protected void doGet(HttpServletRequest req, HttpServletResponse resp){
    resp.sentHeader("Location", "/NEUQHelper/hello/Login");
    resp.setStatus(302);	//重定向状态码
}
2
3
4
重定向和转发的区别
相同点:实现页面的跳转,信息处理的迁移
不同点:
- 转发是将请求转发到另一地址,重定向是用另一个地址去响应
- 重定向url栏会改变,而转发不发生改变
JSP
导入jsp依赖
<dependency>
      <groupId>org.glassfish.web</groupId>
      <artifactId>jstl-impl</artifactId>
      <version>1.2</version>
      <exclusions>
        <exclusion>
          <groupId>javax.servlet</groupId>
          <artifactId>servlet-api</artifactId>
        </exclusion>
        <exclusion>
          <groupId>javax.servlet.jsp</groupId>
          <artifactId>jsp-api</artifactId>
        </exclusion>
        <exclusion>
          <groupId>javax.servlet.jsp.jstl</groupId>
          <artifactId>jstl-api</artifactId>
        </exclusion>
      </exclusions>
    </dependency>
2
3
4
5
6
7
8
9
10
11
12
13
14
15
16
17
18
19
在 .jsp中获取当前项目路径
<form action="${pageContext.request.contextPath}/hello/Login" method="post"></form>
Resquest
HttpServletRequest代表客户端的请求,用户通过Http协议访问服务器,HTTP请求中的所有信息被封装到HttpServletRequest中,通过这个HttpServletRequest的方法,可以获得客户端(网页)的所有信息
1、获取前端传递参数
2、请求转发
ServletContext的请求转发
this.getContext.getRequestDispatcher("/hello").forward(req, resp);
res的请求转发
public class Get extends HttpServlet {
    @Override
    protected void doGet(HttpServletRequest req, HttpServletResponse resp) throws ServletException, IOException {
		resq.getRequestDispatcher("path").forward(req, resp);
    }
}
2
3
4
5
6
重定向和转发的区别
相同点:实现页面的跳转,信息处理的迁移
不同点:
- 转发是将请求转发到另一地址,重定向是用另一个地址去响应
- 重定向url栏会改变(307),而转发不发生改变(302)
Cookie
public class Get extends HttpServlet {
    @Override
    protected void doGet(HttpServletRequest req, HttpServletResponse resp) throws ServletException, IOException {
		//新建一个cookie,以字符串键值对的形式储存数据
        Cookie c = new Cookie("name", "NorthBoat");
        //设置cookie最大保存时间
        c.setMaxAge(24*60*60);
        //将cookie响应到客户端
        resp.addCookie(c);
        //获取客户端的cookies(多个)
        Cookie[] cookies = req.getCookies();
        //依次打印cookie信息
        if(cookies.length > 0){
            for (int i = 0; i < cookies.length; i++) {
                String name1 = cookies[i].getName();
                String value = cookies[i].getValue();
                resp.getWriter().println(name1 + ":" + value + "\n");
            }
        }
    }
}
2
3
4
5
6
7
8
9
10
11
12
13
14
15
16
17
18
19
20
21
Cookie一般会保存在本地的用户目录下appdata
Cookie的一些细节:
- 一个cookie只能保存一个信息
- 一个web站点可以给浏览器发送多个cookie,最多存放20个cookie
- Cookie大小有限制:4kb
- 300个cookie为浏览器上线
如何让cookie瞬间消失:
- 不设置有效期,关闭浏览器,自动失效
- 设置有效期为0
编码问题:
全局设置编码
resp.setCharacterEncoding("utf-8");
resp.setContentType("text/html");
req.setCharacterEncoding("utf-8");
2
3
设置单个字符串编码
//将str转化为指定编码,返回一个String
URLEncoder.encode(String str, String encodeType);
2