Maven
Maven
Java包管理工具
Why Maven
1、在javaweb开发中,需要使用大量的jar包,手动导入很麻烦
2、maven正是一个自动化导入jar包的工具
Maven项目架构管理工具
目前用来方便导入jar包
核心思想:约定大于配置
Maven会规定好你该如何去编写我们的java代码
环境搭建
下载和安装
去官网下载压缩包,解压即可
配置环境变量
配置如下配置
- M2_HOME
- MAVEN_HOME
- 在系统的path中配置 %MAVEN_HOME%\bin
测试Maven是否安装成功
C:\Users\NorthBoat>mvn --version
加速镜像
加速我们的下载
<mirror>
    <id>nexus-aliyun</id>
    <mirrorOf>*,!jeecg,!jeecg-snapshots</mirrorOf>
    <name>Nexus aliyun</name>
    <url>http://maven.aliyun.com/nexus/content/groups/public</url>
</mirror>
2
3
4
5
6
将 conf 文件夹中 settings.xml 文件镜像仓库改为上述mirror
建立本地仓库
本地仓库 <——> 远程仓库
建立一个本地仓库:
在bin同级目录下创建文件夹repo
然后在 setting.xml 中,修改repo路径为自定义路径
<localRepository>D:\Maven\apache-maven-3.8.1\maven-repo</localRepository>
在idea中使用maven
new project ——> maven项目 ——> 勾选模板、勾选maven-javaweb-app ——> 选仓库、配置文件
可能会出现报错:No archetype found in remote catalog. Defaulting to internal catalo
此时在Maven创建项目时设置属性 archetypeCatalog = internal 即可
标准的maven项目目录结构
-src
    -main
    	-java
    	-rources
    	-webapp
    		-WEB-INF
    			-web.xml
    		-index.jsp
2
3
4
5
6
7
8
设置文件夹属性:
1、右键文件夹:mark directory as ...
2、Project Structure ——> Modules:设置文件夹类型
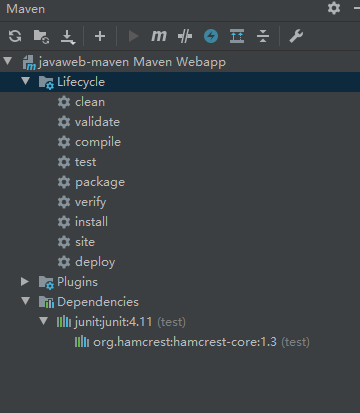
Maven功能栏(Plugins可删除)
在idea中配置tomcat
先在project structure中添加Artifacts:webapp application archive,重命名war包,生成在target目录
点击该处处,配置tomcat

注意:
1、tomcat 10 idea将无法识别其 lib 库
2、报错 No artifacts marked for deployment,在deployment中加一个 javaweb-maven:war 即可
- 我们访问一个网站,必须要一个默认文件夹接管tomcat的webapps
3、虚拟路径映射
4、提示信息乱码
淇℃伅 [main] org.apache.catalina.startup.VersionLoggerListener.log Server.鏈嶅姟鍣ㄧ増鏈�:
到tomcat/conf/目录下
修改logging.properties 找到 java.util.logging.ConsoleHandler.encoding = utf-8这行 更改为 java.util.logging.ConsoleHandler.encoding = GBK,保存退出即可
pom.xml
pom.xml 是maven的核心配置文件
<?xml version="1.0" encoding="UTF-8"?>

<project xmlns="http://maven.apache.org/POM/4.0.0" xmlns:xsi="http://www.w3.org/2001/XMLSchema-instance"
  xsi:schemaLocation="http://maven.apache.org/POM/4.0.0 http://maven.apache.org/xsd/maven-4.0.0.xsd">
  <modelVersion>4.0.0</modelVersion>

  <!--这是初始化配置项目时的GVA:group version artifactId-->
  <groupId>org.example</groupId>
  <artifactId>javaweb-maven</artifactId>
  <version>1.0-SNAPSHOT</version>
  <!--打包方式:war(javaWeb应用)-->
  <packaging>war</packaging>

  <!--配置-->
  <properties>
    <!--项目默认编码-->
    <project.build.sourceEncoding>UTF-8</project.build.sourceEncoding>
    <!--编译版本-->
    <maven.compiler.source>1.7</maven.compiler.source>
    <maven.compiler.target>1.7</maven.compiler.target>
  </properties>

  <!--项目依赖:具体依赖的jar包依赖文件-->
  <dependencies>
    <dependency>
      <groupId>junit</groupId>
      <artifactId>junit</artifactId>
      <version>4.11</version>
      <scope>test</scope>
    </dependency>
  </dependencies>

  <!--项目构建用的东西-->
  <build>
    <finalName>javaweb-maven</finalName>
    <pluginManagement><!-- lock down plugins versions to avoid using Maven defaults (may be moved to parent pom) -->
      <plugins>
        <plugin>
          <artifactId>maven-clean-plugin</artifactId>
          <version>3.1.0</version>
        </plugin>
        <!-- see http://maven.apache.org/ref/current/maven-core/default-bindings.html#Plugin_bindings_for_war_packaging -->
        <plugin>
          <artifactId>maven-resources-plugin</artifactId>
          <version>3.0.2</version>
        </plugin>
        <plugin>
          <artifactId>maven-compiler-plugin</artifactId>
          <version>3.8.0</version>
        </plugin>
        <plugin>
          <artifactId>maven-surefire-plugin</artifactId>
          <version>2.22.1</version>
        </plugin>
        <plugin>
          <artifactId>maven-war-plugin</artifactId>
          <version>3.2.2</version>
        </plugin>
        <plugin>
          <artifactId>maven-install-plugin</artifactId>
          <version>2.5.2</version>
        </plugin>
        <plugin>
          <artifactId>maven-deploy-plugin</artifactId>
          <version>2.8.2</version>
        </plugin>
      </plugins>
    </pluginManagement>
  </build>
</project>
2
3
4
5
6
7
8
9
10
11
12
13
14
15
16
17
18
19
20
21
22
23
24
25
26
27
28
29
30
31
32
33
34
35
36
37
38
39
40
41
42
43
44
45
46
47
48
49
50
51
52
53
54
55
56
57
58
59
60
61
62
63
64
65
66
67
68
69
70
maven的高级之处在于,当你导入一个jar包时,它将自动帮你导入该jar包所依赖的其他jar包
当你要导入jar包时,只需要百度maven仓库,选择所需jar包的相应版本中找到其maven配置,复制粘贴进dependencies中即可
<!-- https://mvnrepository.com/artifact/org.springframework/spring-webmvc
         百度搜索maven仓库,在所需的jar包响应版本中找到其maven依赖,复制粘贴即可-->
<dependency>
    <groupId>org.springframework</groupId>
    <artifactId>spring-webmvc</artifactId>
    <version>5.1.9.RELEASE</version>
</dependency>
2
3
4
5
6
7
有的依赖中有作用域的限定,目前阶段可以删掉
<scope>provided</scope>
有时maven自动导入jar包会失败,我们需要手动去maven仓库下载jar包拷到指定目录下
之后可能会遇到的问题:
由于maven的约定大于配置,我们之后在导出资源时会碰到问题
我们在build中配置resources可解决该问题
<build>
        <resources>
            <resource>
                <directory>src/main/resources</directory>
                <includes>
                    <include>**/*.properties</include>
                    <include>**/*.xml</include>
                </includes>
                <filtering>true</filtering>
            </resource>
            <resource>
                <directory>src/main/java</directory>
                <includes>
                    <include>**/*.properties</include>
                    <include>**/*.xml</include>
                </includes>
                <filtering>true</filtering>
            </resource>
        </resources>
</build>
2
3
4
5
6
7
8
9
10
11
12
13
14
15
16
17
18
19
20
Dependencies
一些好用的依赖
Lombok
导入依赖
<!--lombok-->
<dependency>
    <groupId>org.projectlombok</groupId>
    <artifactId>lombok</artifactId>
    <optional>true</optional>
</dependency>
2
3
4
5
6
基本使用
@Data:包含了所有成员的setter和getter,常用于与数据库对接的实体类
@EqualsAndHashCode:自动生成equals和hashCode方法
package com.seckill.pojo;

import com.baomidou.mybatisplus.annotation.TableName;
import lombok.Data;
import lombok.EqualsAndHashCode;

import java.io.Serializable;
import java.util.Date;

@Data
@EqualsAndHashCode(callSuper = false)
@TableName("t_user")
public class User implements Serializable {

    private static final long serialVersionUID = 1L;
    private Long id;
    private String nickname;
    private String password;
    private String slat;
    private String head;
    private Date registerDate;
    private Date lastLoginDate;
    private Integer loginCount;
}
2
3
4
5
6
7
8
9
10
11
12
13
14
15
16
17
18
19
20
21
22
23
24
@Setter/@Getter
@Setter
@Getter
public class Example{
    private int id;
    private String name;
}
2
3
4
5
6
@AllArgsConstructor/@NoArgsConstructor:全参、无参构造器
@AllArgsConstructor
@NoArgsConstructor
public class Example{
    private int id;
    private String name;
}
2
3
4
5
6
Validation
导入依赖
<dependency>
    <groupId>org.springframework.boot</groupId>
    <artifactId>spring-boot-starter-validation</artifactId>
</dependency>
2
3
4
基本使用
在传入参数处添加@Valid注解
@RequestMapping("/doLogin")
@ResponseBody
public RespBean doLogin(@Valid LoginVo loginVo){
    log.info("{}", loginVo);
    //System.out.println(loginVo.getUsername());
    return userService.doLogin(loginVo);
}
2
3
4
5
6
7
在对应vo处添加规则
@Data
public class LoginVo {
    @NotNull
    @Email
    private String username;
    @Length(min = 8, max = 26)
    private String password;
}
2
3
4
5
6
7
8
自定义注解
新建包validation,放置注解
编写注解
@NotNull源码
//
// Source code recreated from a .class file by IntelliJ IDEA
// (powered by Fernflower decompiler)
//

package javax.validation.constraints;

import java.lang.annotation.Documented;
import java.lang.annotation.ElementType;
import java.lang.annotation.Repeatable;
import java.lang.annotation.Retention;
import java.lang.annotation.RetentionPolicy;
import java.lang.annotation.Target;
import javax.validation.Constraint;
import javax.validation.Payload;

@Target({ElementType.METHOD, ElementType.FIELD, ElementType.ANNOTATION_TYPE, ElementType.CONSTRUCTOR, ElementType.PARAMETER, ElementType.TYPE_USE})
@Retention(RetentionPolicy.RUNTIME)
@Repeatable(NotNull.List.class)
@Documented
@Constraint(
    validatedBy = {}
)
public @interface NotNull {
    String message() default "{javax.validation.constraints.NotNull.message}";

    Class<?>[] groups() default {};

    Class<? extends Payload>[] payload() default {};

    @Target({ElementType.METHOD, ElementType.FIELD, ElementType.ANNOTATION_TYPE, ElementType.CONSTRUCTOR, ElementType.PARAMETER, ElementType.TYPE_USE})
    @Retention(RetentionPolicy.RUNTIME)
    @Documented
    public @interface List {
        NotNull[] value();
    }
}
2
3
4
5
6
7
8
9
10
11
12
13
14
15
16
17
18
19
20
21
22
23
24
25
26
27
28
29
30
31
32
33
34
35
36
37
- 其中
String message()为报错信息
新建validation包,新建所需注解文件,参照@NotNull源码,将其上注解拷贝,注入Validation,注意删掉@Repeatable注解
package com.seckill.validation;


import javax.validation.Constraint;
import javax.validation.Payload;
import java.lang.annotation.*;

@Target({ElementType.METHOD, ElementType.FIELD, ElementType.ANNOTATION_TYPE, ElementType.CONSTRUCTOR, ElementType.PARAMETER, ElementType.TYPE_USE})
@Retention(RetentionPolicy.RUNTIME)
@Documented
@Constraint( validatedBy = {} )
public @interface IsMobile {

    boolean required() default true;

    String message() default "电话号码格式错误";

    Class<?>[] groups() default {};

    Class<? extends Payload>[] payload() default {};
}
2
3
4
5
6
7
8
9
10
11
12
13
14
15
16
17
18
19
20
21
编写实现类
真正的实现逻辑由@Constraint( validatedBy = {} )注解注入自定义注解
在vo包下新建类IsMobileValidator实现ConstraintValidator接口,在isValid方法中实现逻辑
在initialize中可以进行很多参数传递:
- 在注解中定义方法接收用户参数
- 在
ConstraintValidator类的initialize方法中调用注解方法传递参数 - 在
isValid方法中使用参数,编写逻辑
package com.seckill.vo;

import com.seckill.utils.ValidatorUtil;
import com.seckill.validation.IsMobile;
import org.thymeleaf.util.StringUtils;

import javax.validation.ConstraintValidator;
import javax.validation.ConstraintValidatorContext;

public class IsMobileValidator implements ConstraintValidator<IsMobile, String> {

    // 接收注解收到的逻辑
    private boolean required;

    //初始化
    @Override
    public void initialize(IsMobile constraintAnnotation) {
        required = constraintAnnotation.required();
    }

    // 逻辑实现
    @Override
    public boolean isValid(String mobile, ConstraintValidatorContext constraintValidatorContext) {
        // 如果设置required为true,即为设置必须有值,直接通过util判断即可
        if(required){
            return ValidatorUtil.checkMobile(mobile);
        }
        // 若required为false,即为设置可为空,当mobile为空返回true,不为空则调用util
        if(StringUtils.isEmpty(mobile)){
            return true;
        }
        return ValidatorUtil.checkMobile(mobile);
    }
}
2
3
4
5
6
7
8
9
10
11
12
13
14
15
16
17
18
19
20
21
22
23
24
25
26
27
28
29
30
31
32
33
34
35
注入注解
@Constraint( validatedBy = {IsMobileValidator.class} )
异常处理
在controller接收参数时加上注解,若参数不匹配浏览器将直接报错400 bad request,后端报错org.springframework.validation.BindException
在spring-boot中处理异常通常有两种方式
@ControllerAdvice和@ExceptionHandler配合使用ErrorController类实现
第一种只能处理控制台异常,第二种可以处理404、400等错误,这里使用第一种方式进行处理
新建excption包,编写异常处理类和自定义异常类
GlobalExceptionHandler.java:异常处理类
package com.seckill.exception;

import com.seckill.vo.RespBean;
import com.seckill.vo.RespBeanEnum;
import org.springframework.validation.BindException;
import org.springframework.web.bind.annotation.ExceptionHandler;
import org.springframework.web.bind.annotation.RestControllerAdvice;

@RestControllerAdvice
public class GlobalExceptionHandler {

    @ExceptionHandler(Exception.class)
    public RespBean ExceptionHandler(Exception e){
        if(e instanceof GlobalException){
            GlobalException ge = (GlobalException)e;
            return RespBean.error(ge.getRespBeanEnum());
        } else if(e instanceof BindException){
            BindException be = (BindException)e;
            RespBean respBean = RespBean.error(RespBeanEnum.LOGIN_PATTERN_ERROR);
            respBean.setMessage("参数校验异常:" + be.getBindingResult().getAllErrors().get(0).getDefaultMessage());
            return respBean;
        }
        return RespBean.error(RespBeanEnum.SERVER_ERROR);
    }
}
2
3
4
5
6
7
8
9
10
11
12
13
14
15
16
17
18
19
20
21
22
23
24
25
@ControllerAdvice/RestControllerAdvice会主动接管项目中出现的所有异常,即当出现异常时,spring-boot将主动调用被修饰类中的方法
@ExceptionHandler用于修饰方法,限定该方法处理的异常类型
- 二者关系类似于
@Controller和@RequestMapping的关系
GlobalException:自定义异常类,方便接收和返回不同的异常,内置RespBean
package com.seckill.exception;


import com.seckill.vo.RespBeanEnum;
import lombok.AllArgsConstructor;
import lombok.Data;
import lombok.NoArgsConstructor;

@Data
@NoArgsConstructor
@AllArgsConstructor
public class GlobalException extends RuntimeException{
    private RespBeanEnum respBeanEnum;
}
2
3
4
5
6
7
8
9
10
11
12
13
14
具体使用
UserServiceImpl.java:Service层主动抛出异常
@Service
public class UserServiceImpl extends ServiceImpl<UserMapper, User> implements IUserService {

    private UserMapper userMapper;
    @Resource
    public void setUserMapper(UserMapper userMapper){
        this.userMapper = userMapper;
    }

    /**
     * 登录功能
     * @param loginVo
     * @return
     */
    @Override
    public RespBean doLogin(LoginVo loginVo) {
        String username = loginVo.getUsername();
        String password = loginVo.getPassword();
        System.out.println(username);

        User user = userMapper.selectById(username);
        if(user == null){
            throw new GlobalException(RespBeanEnum.LOGIN_NOT_FOUND);
        }
        if(!MD5Util.formPassToDBPass(password, user.getSlat()).equals(user.getPassword())) {
            throw new GlobalException(RespBeanEnum.LOGIN_PASSWORD_WRONG);
        }
        return RespBean.success();
    }
}
2
3
4
5
6
7
8
9
10
11
12
13
14
15
16
17
18
19
20
21
22
23
24
25
26
27
28
29
30
LoginController.java:Controller层进行@Valid验证被动抛出异常org.springframework.validation.BindException,通过自己编写的Handler进行捕获处理,并返回一个RespBean
@Controller
@RequestMapping("/login")
@Slf4j
public class LoginController {

    private IUserService userService;
    @Autowired
    public void setUserService(IUserService userService){
        this.userService = userService;
    }

    @RequestMapping("/doLogin")
    @ResponseBody
    public RespBean doLogin(@Valid LoginVo loginVo){ //参数校验
        log.info("{}", loginVo);
        //模拟前端进行一次MD5加密
        loginVo.setPassword(MD5Util.inputPassToFormPass(loginVo.getPassword()));
        //System.out.println(loginVo.getUsername());
        return userService.doLogin(loginVo);
    }
}
2
3
4
5
6
7
8
9
10
11
12
13
14
15
16
17
18
19
20
21