线程安全集合 - 线程池
线程安全的集合
集合类
初识函数式接口
public class ListTest {
    public static void main(String[] args) {
        List<String> list = Arrays.asList("1", "2", "3");
        list.forEach(s->{System.out.print(s + " ");});
    }
}
2
3
4
5
6
List
数据结构:顺序表或链表
写入时复制 COW 计算机程序设计领域的一种优化策略
以下代码将报错 java.util.ConcurrentModificationException:并发修改异常
import java.util.ArrayList;
import java.util.Arrays;
import java.util.List;
import java.util.UUID;

public class ListTest {
    public static void main(String[] args) {
        List<String> l = new ArrayList<>();
        for (int i = 0; i < 10; i++) {
            new Thread(()->{
                l.add(UUID.randomUUID().toString().substring(0, 5));
                System.out.println(l);
            }, String.valueOf(i)).start();
        }
    }
}
2
3
4
5
6
7
8
9
10
11
12
13
14
15
16
解决方案:
Vector
List<String> list = new Vector<>();
Collections.synchronizedList
List<String> l = Collections.synchronizedList(new ArrayList());
CopyOnWriteArrayList
List<String> l = new CopyOnWriteArrayList<>();
与 ArrayList 相同,在 CopyOnWriteArrayList 内部同样维护了一个数组,不同的是该数组有 transient volatile 修饰
private transient volatile Object[] array;
其 add 方法采取写入时复制的方式,即将原数组复制一份(长度+1),再插入新元素,线程安全性由 lock 锁保证
与 Vector 不同,CopyOnWriteArrayList 中并无 synchronized 修饰,故其效率较高
public boolean add(E e) {
    final ReentrantLock lock = this.lock;
    lock.lock();
    try {
        Object[] elements = getArray();
        int len = elements.length;
        Object[] newElements = Arrays.copyOf(elements, len + 1);
        newElements[len] = e;
        setArray(newElements);
        return true;
    } finally {
        lock.unlock();
    }
}
1
2
3
4
5
6
7
8
9
10
11
12
13
14
COW:计算机程序设计领域的一种优化策略
在写入时避免覆盖造成数据问题 ——> 读写分离
Set
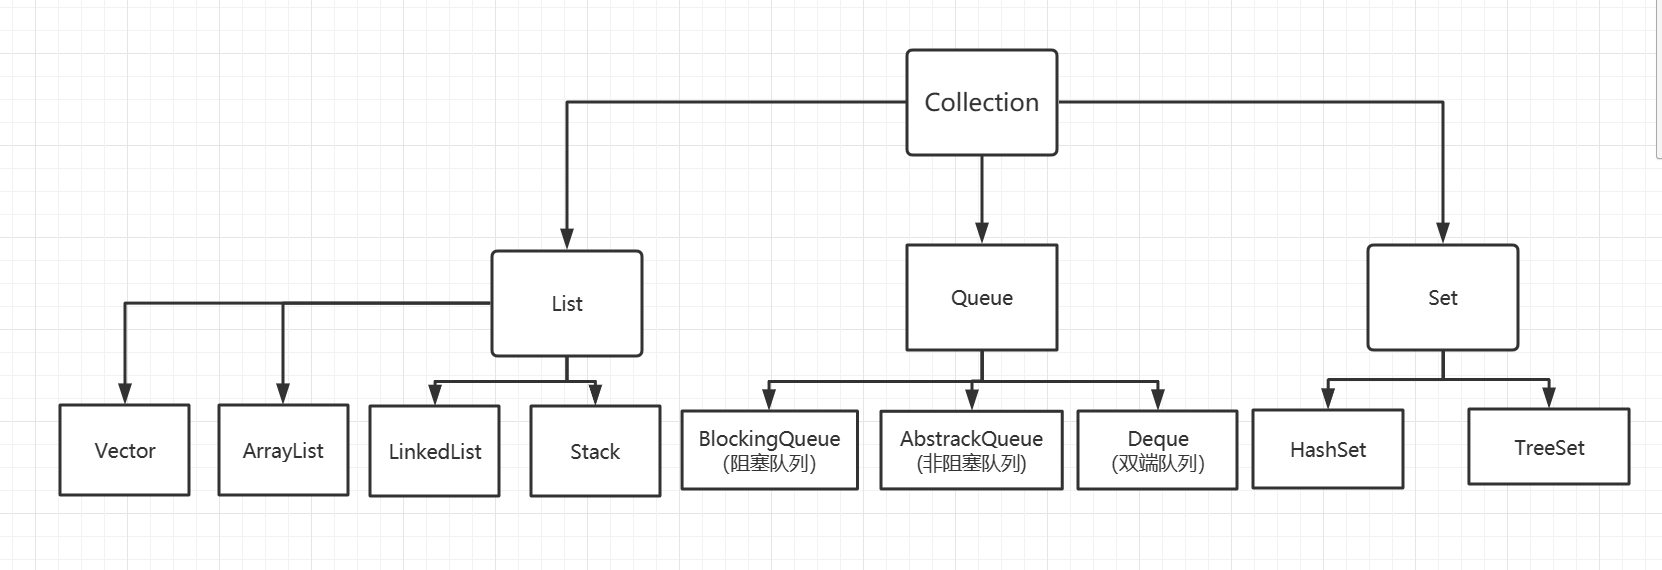
Iterable ——> Collection ——> List + Set + BlockingQueue(阻塞队列)
与 List 同理可得 Set 同样线程不安全,报错 java.util.ConcurrentModificationException
import java.util.HashSet;
import java.util.Set;
import java.util.UUID;

public class SetTest {
    public static void main(String[] args) {
        Set<String> set = new HashSet<>();
        for(int i = 0; i < 10; i++){
            new Thread(()->{
                set.add(UUID.randomUUID().toString().substring(0, 5));
                System.out.println(Thread.currentThread().getName() + set);
            }, String.valueOf(i)).start();
        }
    }
}
2
3
4
5
6
7
8
9
10
11
12
13
14
15
解决方案:
Collections.synchronizedSet
Set<String> set = Collections.synchronizedSet(new HashSet<>());
CopyOnWriteArraySet
Set<String> set = new CopyOnWriteArraySet<>();
HashSet 的底层:HashMap
public HashSet() {
    map = new HashMap<>();
}

//CopyOnWriteArraySet维护的map由transient修饰
private transient HashMap<E,Object> map;

public boolean add(E e) {
    return map.put(e, PRESENT)==null;
}

//PRESENT是一个不变的值
private static final Object PRESENT = new Object();
2
3
4
5
6
7
8
9
10
11
12
13
Map
数据结构:哈希表(散列表)
默认初始容量:16
默认加载因子:0.75
解决方案:
Collections.synchronizedMap
Map<String, String> map = Collections.synchronizedMap(new HashMap<>());
ConcurrentHashMap
Map<String, String> map = new ConcurrentHashMap<>();
其底层数据多由 transient volatile 修饰,方法关键步骤由 synchronized 修饰,在下无法理解
Callable
Callable 和 Runnable 的区别
- Callable 有返回值
- Callable 可以抛出异常
- 方法不同,run() ——> call()
Thread 只能 start 继承了 Runnable(重写了run方法) 的类,怎么用 Thread 去跑继承了 Callable 的类呢?
阅读jdk文档可以发现 Runnable 有一个实现类:FutureTask
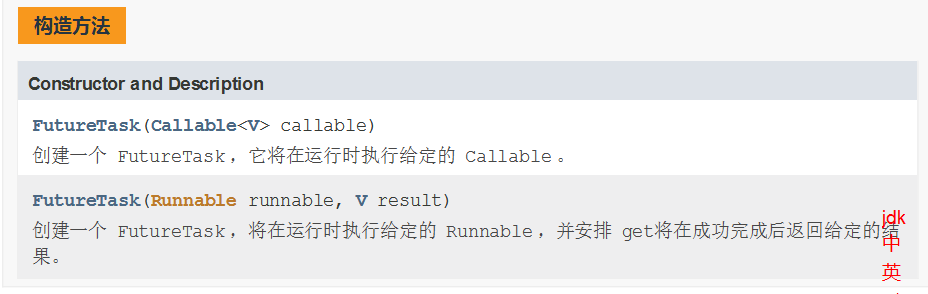
它既是 Runnable 的实现类,又可以由 Callable 进行构造,如此便实现了 Callable 和 Thread 的连接
import java.util.concurrent.Callable;
import java.util.concurrent.FutureTask;

public class CallableTest {
    public static void main(String[] args) {
        new Thread(new FutureTask<>(new MyThread())).start();
        System.out.println();
    }
}

class MyThread implements Callable<String>{
    @Override
    public String call() throws Exception {
        System.out.println("wdnmd");
        return "Hello Callable";
    }
}
2
3
4
5
6
7
8
9
10
11
12
13
14
15
16
17
如何获取 Callable 的返回值?
MyThread mythread = new MyThread();
FutureTask<String> futuretask = new FutureTask<>(t);
new Thread(futuretask).start();
String res = futuretask.get();
2
3
4
注意
- FutureTask 的 get 方法是阻塞的,也就是说,只有 call() 方法跑完之后,才会 get 到值,若 get 在 start 前,则程序死锁
- call() 方法是有缓存的,开两条线程跑同一个 call 函数,只会有一个结果,如上述代码若开两条线程只会输出一句 wdnmd
帮助线程安全的辅助类
CountDwonLatch
latch:门栓
用于倒计时,count 为倒计的数量
- 构造方法
CountDownLatch(int count);
- 倒数,令 count 减一
countDown()
- 等待方法,阻塞,当 count 为0时唤醒
await();
测试代码:
需要注意的是,我开启了一条线程输出 “All Out”,它将在 count = 0 时才会被执行,即等待计数结束
import java.util.concurrent.CountDownLatch;

public class CountDownLatchTest {
    public static void main(String[] args) {
        CountDownLatch c = new CountDownLatch(10);

        new Thread(()->{
            try {
                c.await();
            } catch (InterruptedException e) {
                e.printStackTrace();
            }finally {
                System.out.println("All Out");
            }
        }).start();

        for (int i = 0; i < 10; i++) {
            new Thread(()->{
                System.out.println(Thread.currentThread().getName() + " Go Out");
                c.countDown();
            }, String.valueOf(i+1)).start();
        }
    }
}
2
3
4
5
6
7
8
9
10
11
12
13
14
15
16
17
18
19
20
21
22
23
24
结果:
1 Go Out
3 Go Out
2 Go Out
6 Go Out
8 Go Out
9 Go Out
7 Go Out
5 Go Out
4 Go Out
10 Go Out
All Out

Process finished with exit code 0
2
3
4
5
6
7
8
9
10
11
12
13
CycilcBarrier
- 构造方法
- parties 为所经历的线程最大数
- lambda 表达式中为当经历线程数达到 parties 时执行的语句
CyclicBarrier(int parties, Lambda表达式)
- 计数、等待方法
- 在线程中执行 await 时,parties+1,同时判断是否达到初始化时的最大值,达到则执行构造方法中的 λ 表达式
await();
测试代码:
import java.util.concurrent.BrokenBarrierException;
import java.util.concurrent.CyclicBarrier;

public class CyclicBarrierTest {
    public static void main(String[] args) {
        CyclicBarrier c = new CyclicBarrier(7, ()->{
            System.out.println("集齐七颗龙珠,召唤神龙");
        });

        for (int i = 0; i < 7; i++) {
            final int temp = i+1;
            new Thread(()->{
                System.out.println("收集到第" + temp + "颗龙珠");
                try {
                    c.await();
                } catch (InterruptedException e) {
                    e.printStackTrace();
                } catch (BrokenBarrierException e) {
                    e.printStackTrace();
                }
            }, String.valueOf(i+1)).start();
        }
    }
}
2
3
4
5
6
7
8
9
10
11
12
13
14
15
16
17
18
19
20
21
22
23
24
结果:
收集到第1颗龙珠
收集到第7颗龙珠
收集到第4颗龙珠
收集到第3颗龙珠
收集到第5颗龙珠
收集到第2颗龙珠
收集到第6颗龙珠
集齐七颗龙珠,召唤神龙

Process finished with exit code 0
2
3
4
5
6
7
8
9
10
Semaphore
信号量
import java.util.concurrent.Semaphore;
import java.util.concurrent.TimeUnit;

public class SemaphoreTest {
    public static void main(String[] args) {
        //初始化线程数量(停车位)
        Semaphore semaphore = new Semaphore(4);

        for (int i = 0; i < 7; i++) {
            new Thread(()->{
                try {
                    //acquire():获得许可,阻塞,判断当前是否有闲置的许可
                    semaphore.acquire();
                    System.out.println(Thread.currentThread().getName() + " 停车");
                    TimeUnit.SECONDS.sleep(2);
                } catch (InterruptedException e) {
                    e.printStackTrace();
                } finally {
                    System.out.println(Thread.currentThread().getName() + " 离开车位");
                    //释放许可
                    semaphore.release();
                }
            }, String.valueOf(i+1)).start();
        }
    }
}
2
3
4
5
6
7
8
9
10
11
12
13
14
15
16
17
18
19
20
21
22
23
24
25
26
- acquire():获得,如果信号量满了,等待,直到被释放为止
- release():释放,会将信号量释放+1,然后唤醒等待的线程
作用:
- 多个共享资源互斥的使用(如停车位)
- 并发限流,控制最大的线程数
读写锁
- 读可以被多个线程读,写只能由单线程写
- 写的时候不能读,读的时候不能写
ReadWriteLock
与 Lock 锁的用法类似,进入方法时加锁,将业务代码放在 try / catch 语句中,在 finally 中解锁
注意读写锁并没有 Condition,它自身在加锁解锁的过程中完成了 Condition 的精确控制,提高了锁细粒度
import java.util.HashMap;
import java.util.Map;
import java.util.UUID;
import java.util.concurrent.ConcurrentHashMap;
import java.util.concurrent.locks.*;

public class ReadWriteLockTest {
    public static void main(String[] args) {
        MyCacheLock myCache = new MyCacheLock();

        for (int i = 0; i < 10; i++) {
            final int temp = i;
            new Thread(()->{
                myCache.put(temp, UUID.randomUUID().toString().substring(0, 3));
            }, String.valueOf(i)).start();
        }

        for (int i = 0; i < 10; i++) {
            final int temp = i;
            new Thread(()->{
                myCache.get(temp);
            }, String.valueOf(i)).start();
        }
    }
}

class MyCacheLock{

    private volatile Map<Integer, String> map = new HashMap<>();

    //读写锁,更加细粒度的控制
    private ReadWriteLock readWriteLock = new ReentrantReadWriteLock();

    //写
    public void put(Integer key, String val){
        readWriteLock.writeLock().lock();
        try{
            System.out.println(Thread.currentThread().getName() + "正在写入");
            map.put(key, val);
            System.out.println(Thread.currentThread().getName() + "写入完毕");
        }catch (Exception e){
            e.printStackTrace();
        }finally {
            readWriteLock.writeLock().unlock();
        }
    }
    //读
    public void get(Integer key){
        readWriteLock.readLock().lock();
        try{
            System.out.println(Thread.currentThread().getName() + "正在读取");
            map.get(key);
            System.out.println(Thread.currentThread().getName() + "读取完毕");
        }catch (Exception e){
            e.printStackTrace();
        }finally {
            readWriteLock.readLock().unlock();
        }
    }
}


class MyCache{
    private Map<String, String> map = new HashMap<>();

    public void put(String key, String val){
        System.out.println(Thread.currentThread().getName() + "正在写入");
        map.put(key, val);
        System.out.println(Thread.currentThread().getName() + "写入完毕");
    }

    public void get(String key){
        System.out.println(Thread.currentThread().getName() + "正在读取");
        map.get(key);
        System.out.println(Thread.currentThread().getName() + "读取完毕");
    }
}
2
3
4
5
6
7
8
9
10
11
12
13
14
15
16
17
18
19
20
21
22
23
24
25
26
27
28
29
30
31
32
33
34
35
36
37
38
39
40
41
42
43
44
45
46
47
48
49
50
51
52
53
54
55
56
57
58
59
60
61
62
63
64
65
66
67
68
69
70
71
72
73
74
75
76
77
用 MyCache 跑多线程时,会出现多个线程同时 “正在写入” 的情况,这样很明显很不安全,加锁后解决这一问题,即同时只会有单条线程进行 “写” 的操作
我的代码和kuangshen一模吊样,但就是先读后写,我很烦
Java 线程池
阻塞队列
阻塞:写入队列已满、读取队列为空时,不得不阻塞等待
队列:FIFO(I => 写入,O => 读取),先进先出
什么情况我们会用阻塞队列? 多线程,线程池
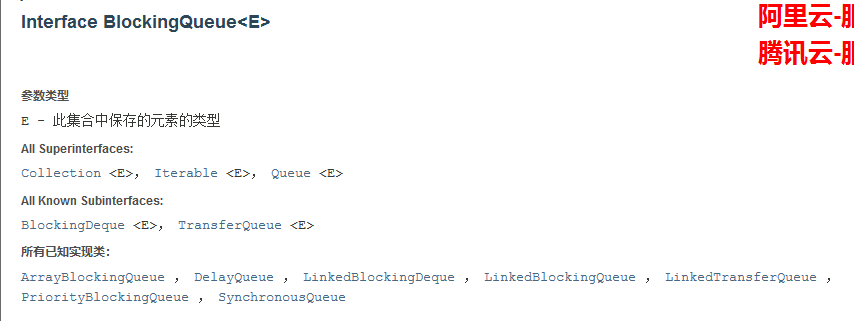
ArrayBlockingQueue
队列的使用
添加、移除
四组API
| 方式 | 抛出异常 | 有返回值,不抛出异常 | 阻塞等待(一直阻塞) | 等待超时 |
|---|---|---|---|---|
| 添加 | add() | offer() | put() | offer(...) |
| 移除 | remove() | poll() | take() | poll(..) |
| 返回队首元素 | element() | peek() | - | - |
在编写代码时,一定要将泛型写上,这是编程的一个规范,减少检查时间
异常:
/**
* 抛出异常
*/
public void test1(){
    BlockingQueue<String> blockingQueue = new ArrayBlockingQueue<>(3);

    //返回 boolean,添加成功则返回 true
    System.out.println(blockingQueue.add("a")
    System.out.println(blockingQueue.add("b"));
    System.out.println(blockingQueue.add("c"));

    //当队列已满,继续 add(),将报错 java.lang.IllegalStateException: Queue full
    //System.out.println(blockingQueue.add("d"));

    for (int i = 0; i < 3; i++) {
        //element 仅返回队首元素
        System.out.println(blockingQueue.element());
        //remove 同样返回队首元素,同时移除
        blockingQueue.remove();
    }
	//当队列已空,继续 remove,将报错 java.util.NoSuchElementException
    //System.out.println(blockingQueue.remove());
}
/**
* 不抛出异常,有返回值
*/
public void test2(){
    BlockingQueue<String> blockingQueue = new ArrayBlockingQueue<>(3);
    System.out.println(blockingQueue.offer("a"));
    System.out.println(blockingQueue.offer("b"));
    System.out.println(blockingQueue.offer("c"));

    //当队列已满,继续 offer,将不成功,并且返回 false,不抛出异常
    System.out.println(blockingQueue.offer("d"));

    for (int i = 0; i < 3; i++) {
        System.out.println(blockingQueue.peek());
        blockingQueue.poll();
    }
    //当队列已空,继续 poll,将得到 null,不抛出异常
    System.out.println(blockingQueue.poll());
}

/**
* 等待,阻塞
*/
public void test3() throws InterruptedException {
    BlockingQueue<String> blockingQueue = new ArrayBlockingQueue<>(3);
    blockingQueue.put("a");
    blockingQueue.put("b");
    blockingQueue.put("c");

    //此时队列已满,若继续向里put,将一直阻塞,直到队列中有空余位置
    //blockingQueue.put("d");

    for (int i = 0; i < 3; i++) {
        System.out.println(blockingQueue.take());
    }
    //此时队列已空,若继续take,同样会一直阻塞,直到队列中由元素了被唤醒执行
    //System.out.println(blockingQueue.take());
}

/**
* 超时等待
* long timeLimit:超时等待时间
* TimeUnit timeunit:时间单位
*/
public void test4() throws InterruptedException {
    BlockingQueue<String> blockingQueue = new ArrayBlockingQueue<>(3);
    System.out.println(blockingQueue.offer("a"));
    System.out.println(blockingQueue.offer("b"));
    System.out.println(blockingQueue.offer("c"));

    //超时等待 2 秒,超出 2 秒返回false,不继续等待
    System.out.println(blockingQueue.offer("d", 2, TimeUnit.SECONDS));

    for (int i = 0; i < 3; i++) {
        System.out.println(blockingQueue.poll());
    }
    //同理等待 2 秒,超出 2 秒则返回null
    System.out.println(blockingQueue.poll(2, TimeUnit.SECONDS));
}
2
3
4
5
6
7
8
9
10
11
12
13
14
15
16
17
18
19
20
21
22
23
24
25
26
27
28
29
30
31
32
33
34
35
36
37
38
39
40
41
42
43
44
45
46
47
48
49
50
51
52
53
54
55
56
57
58
59
60
61
62
63
64
65
66
67
68
69
70
71
72
73
74
75
76
77
78
79
80
81
82
SynchronousQueue
同步队列
没有容量:进去一个元素,必须等待取出来以后,才可以继续往里放一个元素(有点像信号量)
方法:put()、take()
/**
 * 同步队列
 */
public class SynchronizedQueueTest {
    public static void main(String[] args) {
        BlockingQueue<String> blockingQueue = new SynchronousQueue<>();
        new Thread(()->{
            try {
                System.out.println(Thread.currentThread().getName()+" put 1");
                blockingQueue.put("1");
                System.out.println(Thread.currentThread().getName()+" put 2");
                blockingQueue.put("2");
                System.out.println(Thread.currentThread().getName()+" put 3");
                blockingQueue.put("3");
            } catch (InterruptedException e) {
                e.printStackTrace();
            }
        }, "T1").start();

        new Thread(()->{
            try{
                TimeUnit.SECONDS.sleep(1);
                System.out.println(Thread.currentThread().getName()+" take "+blockingQueue.take());
                TimeUnit.SECONDS.sleep(1);
                System.out.println(Thread.currentThread().getName()+" take "+blockingQueue.take());
                TimeUnit.SECONDS.sleep(1);
                System.out.println(Thread.currentThread().getName()+" take "+blockingQueue.take());
            }catch (InterruptedException e){
                e.printStackTrace();
            }
        }, "T2").start();
    }
}
2
3
4
5
6
7
8
9
10
11
12
13
14
15
16
17
18
19
20
21
22
23
24
25
26
27
28
29
30
31
32
33
结果:
T1 put 1
T2 take 1
T1 put 2
T2 take 2
T1 put 3
T2 take 3

Process finished with exit code 0
2
3
4
5
6
7
8
线程池
池化技术
三大方法七大参数
程序的运行,本质:占用系统的资源 ——> 优化资源的使用 ——> 池化技术
线程池、连接池、内存池、对象池......
池化技术:事先准备好一些资源,需要使用则从池中取,用完后还回
线程池的优点:
- 降低资源的消耗
- 提高响应的速度
- 方便管理
- 线程复用、可以控制最大并发
三大方法
单例线程池
ExecutorService threadPool = Executors.newSingleThreadExecutor();
自定义最大线程池
ExecutorService threadPool = Executors.newFixedThreadPool(5);
自适应线程池
ExecutorService threadPool = Executors.newCachedThreadPool();
测试代码
- 在业务跑完后关闭线程池:shutdown(),否则会一直阻塞
import java.util.concurrent.ExecutorService;
import java.util.concurrent.Executors;

public class Test1 {
    public static void main(String[] args) {
        //ExecutorService threadPool = Executors.newSingleThreadExecutor();
        //ExecutorService threadPool = Executors.newFixedThreadPool(5);
        ExecutorService threadPool = Executors.newCachedThreadPool();

        try{
            for (int i = 0; i < 100; i++) {
                threadPool.execute(()->{
                    System.out.println(Thread.currentThread().getName() + " ok");
                });
            }
        }catch (Exception e){
            e.printStackTrace();
        }finally {
            threadPool.shutdown();
        }
    }
}
2
3
4
5
6
7
8
9
10
11
12
13
14
15
16
17
18
19
20
21
22
七大参数
通过源码可以发现,三大方法中底层返回的都与一个 ThreadPoolExecutor 有关
public static ExecutorService newSingleThreadExecutor() {
        return new FinalizableDelegatedExecutorService
            (new ThreadPoolExecutor(1, 1,
                                    0L, TimeUnit.MILLISECONDS,
                                    new LinkedBlockingQueue<Runnable>()));
}

public static ExecutorService newFixedThreadPool(int nThreads) {
        return new ThreadPoolExecutor(nThreads, nThreads,
                                      0L, TimeUnit.MILLISECONDS,
                                      new LinkedBlockingQueue<Runnable>());
}

public static ExecutorService newCachedThreadPool() {
        return new ThreadPoolExecutor(0, Integer.MAX_VALUE,	//约为21亿 ——> oom(out of memory)
                                      60L, TimeUnit.SECONDS,
                                      new SynchronousQueue<Runnable>());
}
2
3
4
5
6
7
8
9
10
11
12
13
14
15
16
17
18
ThreadPoolExcutor
public ThreadPoolExecutor(int corePoolSize,	//核心线程数
                              int maximumPoolSize,	//最大线程数
                              long keepAliveTime,	//超时时间,超时未调用则还回线程
                              TimeUnit unit,	//超时时间单位
                              BlockingQueue<Runnable> workQueue,	//阻塞队列
                              ThreadFactory threadFactory,	//线程工厂,创建线程的,一般不动
                              RejectedExecutionHandler handler	//拒绝策略) {
        if (corePoolSize < 0 ||
            maximumPoolSize <= 0 ||
            maximumPoolSize < corePoolSize ||
            keepAliveTime < 0)
            throw new IllegalArgumentException();
        if (workQueue == null || threadFactory == null || handler == null)
            throw new NullPointerException();
        this.acc = System.getSecurityManager() == null ?
                null :
                AccessController.getContext();
        this.corePoolSize = corePoolSize;
        this.maximumPoolSize = maximumPoolSize;
        this.workQueue = workQueue;
        this.keepAliveTime = unit.toNanos(keepAliveTime);
        this.threadFactory = threadFactory;
        this.handler = handler;
}
2
3
4
5
6
7
8
9
10
11
12
13
14
15
16
17
18
19
20
21
22
23
24
自定义线程池
//自定义线程池
ExecutorService threadPool = new ThreadPoolExecutor(
        2,	//核心线程数
        5,	//最大线程数
        2,	//超时等待时间
        TimeUnit.SECONDS,	//时间单位
        new ArrayBlockingQueue<>(3),	//阻塞队列(等候区)
        Executors.defaultThreadFactory(),	//默认线程工厂
        new ThreadPoolExecutor.DiscardOldestPolicy()	//拒绝策略
);
2
3
4
5
6
7
8
9
10
四种拒绝策略
- 1、new ThreadPoolExecutor.AbortPolicy():当线程已满、队列已满,再进任务时,不执行该任务并且抛出移除
- 2、new ThreadPoolExecutor.CallerRunsPolicy():当满员时再进任务,将该任务打发回其发起的地方,如此处将多余的线程返回 main 线程执行
- 3、new ThreadPoolExecutor.DiscardPolicy():当满员时再进任务,不执行该任务且不抛出异常
- 4、new ThreadPoolExecutor.DiscardOldestPolicy():与(3)相似,但多出的任务将和线程池中最早的任务竞争一个线程,若竞争成功则执行,失败则不执行,
import java.util.concurrent.*;
public class Test2 {
    public static void main(String[] args) {
        //自定义线程池
        ExecutorService threadPool = new ThreadPoolExecutor(
                2,
                5,
                2,
                TimeUnit.SECONDS,
                new ArrayBlockingQueue<>(3),
                Executors.defaultThreadFactory(),
                new ThreadPoolExecutor.DiscardOldestPolicy()
        );

        try{
            for (int i = 0; i < 9; i++) {
                threadPool.execute(()->{
                    System.out.println(Thread.currentThread().getName() + " ok");
                });
            }
        }catch (Exception e){
            e.printStackTrace();
        }finally {
            //关闭线程池
            threadPool.shutdown();
        }
    }
}
2
3
4
5
6
7
8
9
10
11
12
13
14
15
16
17
18
19
20
21
22
23
24
25
26
27
28
最大线程
最大线程如何定义
1、CPU密集型
ExecutorService threadPool = new ThreadPoolExecutor(
        2,
    	//获取CPU核数,最大利用CPU效率
        Runtime.getRuntime().availableProcessors(),
        2,
        TimeUnit.SECONDS,
        new ArrayBlockingQueue<>(3),
        Executors.defaultThreadFactory(),
        new ThreadPoolExecutor.DiscardOldestPolicy()
);
2
3
4
5
6
7
8
9
10
2、IO密集型
判断程序中十分耗 IO 资源的线程数量,将最大线程数一般设置为两倍于此